
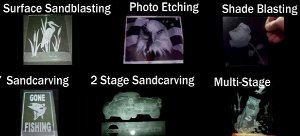
Here are some basic steps to sandcarving glass with a two stage method. This is just one way to etch glass, and you can see some of the other popular ways by going to the my home page. If you have read my ebook or read through the site, it discusses this as the major reason to use a pressure pot sandblaster. For more information about the basics, you can read this page: glassetchingsecrets.com/sandcarving.html
Sandcarving Process
Through a series of sandblasting stages, you can carve a 3 dimensional shape into the glass. This is very basic and can get more advanced. If you would like to know more about the advanced ways, please leave a comment below.
Anyway, here are the basic steps to sandcarve a simple 2 stage process with a sandblaster.
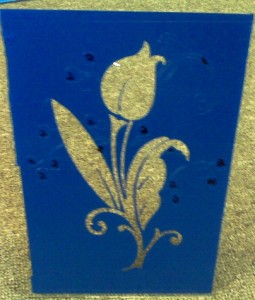
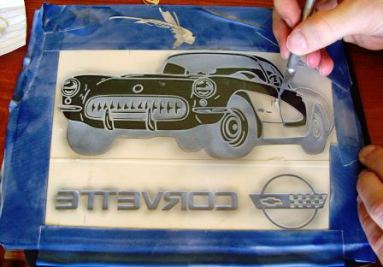
First, place your stencil on the glass, and cut out the pattern with a knife by following the lines. This example is with a flower pattern by Ruth Webb Lee*. You will need to observe the stencil design. As you can see, I marked areas of the cut stencil with numbers. The number 1 means it’s the first blasting and is the deepest to be carved. The number 2 means it’s the second blasting and is a light etch step. Remove the number one areas of the stencil or the areas that would be closer to the observer when looking at. The picture below shows the first stage which is ready to be blasted:
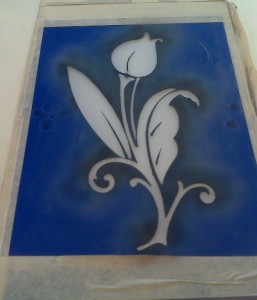
Below is a picture of the first stage deeply sand carved with a pressure pot blaster:
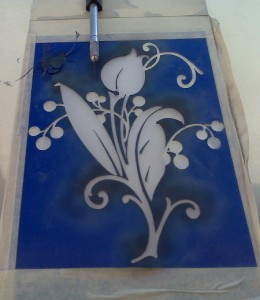
After you have carved the glass deep, then you can begin peeling back the stencil for the number 2 stage. Remember, you can mark the areas with a Sharpe marker like I did. I marked the stencil areas with the number 2. As you can see, I pulled the areas, and it’s ready to be lightly sandblasted below:
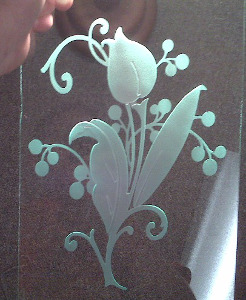
Then, for the final step, after the second stage was lightly etched, you can remove the stencil resist and clean up. Since I did a reverse etching, which is the best way when sandcarving glass, you will need to flip the piece around as shown below:
If you liked this simple sand carving tutorial, please bookmark this page with the buttons below. I will have more for you soon.
Update: Some people have been having problems with photo resists and stencils coming off, so I made a post about fixing photoresist blowout problems (www.glassetchingsecrets.com/blog/photoresist-blowouts/). I hope these tips will help. Feedback would be great, just leave me a comment!
Reference:
Lee, Ruth Webb. Ruth Webb Lee’s Handbook of Early American Pressed Glass Patterns. Framingham Centre, Mass.: R.W. Lee, 1936. Print.
Share this on social media or email by clicking below!

Nice job on the flower Eric. Keep the beginner projects coming. Another tip on the 3 mil photoresist is to keep the nozzle moving. Never linger in one spot as the resist heats up quickly and will fail.
I appreciate the comment Glen and thanks for the good tip. I think in the other blog post, I explained how you can sandcarve with 3 mil stencils. The key is to use a finer grit. The stencil used above was a 3 mil resist made from my cutter. I used 180 grit on it and I can cut fairly deep. I know it sounds ridiculous and maybe unsafe or unprofessional, but it works. Thats one way to get around the expensive thick sandmasks. And since I was going to use the finer grit no matter what, it works out. A finer grit makes nicer etchings.
I appreciate your info on adv. sandcarving-glass.. WOW & WOW this is great stuff you have sent us, my wife (Peggy) and I do want to thank you. we have looked on line (E-Bay) for the vinyl, is this always so expensive?? we need to get some fine grit:: and where do we get this from ????
John & Peggy James
Hi Eric, thank you for this free tutorial, I appreciate it indeed. I have learned something new and can only benefit from it, hope to see more of these in future!
Regard
ED
Thanks John and Ed. I appreciate your comments as this does take alot of time to put these out there for you, even if it doesn’t look like. And sorry its not the best pictures; I kind of took them with my cell phone.
Thanks for the tips and info on 2 stage sandblasting. Was great for me to understand how it was done. Will led to some interesting work in the future . Keep them coming please.
I WOWLD LIKE TO KNOW A LOT MORE ABOUT SANDCARVING AND SHADING
Thanks very much for the info. with stages on this site. hope people don’t take your info. for granted. I’ve looked around and a lot of folks are vague at best when explaining the process. protected they art..I understand..but fore someone like me. I’m not in it for gains. its peaceful and almost meditative. Therapeutic I guess I’m saying..Thanks again and keep it coming..
Thanks Shane. I first started the site because I wanted to offer information that I didn’t see elsewhere. Its a slow and time consuming process but I’ll try and update the site with more info. Any topics or questions then let me know.
I want to know more. Why do you use a photoresist instead of vinyl stencil? What pressure do you use? What size nozzle do you recommend? software for designing artwork?
Thanks you
Charlie
Photoresist is better if you have a very intricate pattern. It does more detailed work.
For sandcarving you usually want to blast at about 60 PSI or more. See what works best for you. A good nozzle size is 3/32″.
Sorry, I didn’t check, but did you get a hold of the Glass Etching Secrets manual? It talks about software in there. There is too many software to list.
yes I did get a copy of the manual. Thanks looks to me like the photoresist is better for detail but limited to size.
Is there any kind of light tape that you can put on the edge of glass to highlight the etching?
Thanks Charlie!
Yes, photoresist is better for very fine detail. Stencil cutters can cut fairly fine too but its harder to weed out intricate parts. They do have fairly large photoresist also but the cost is ridiculously high compared to using a stencil cutter for it.
Most people use LED strips to light up the glass.
I have found on etching mirror on the face of the glass to enhance the picture, I Clean the etched area leaving the stencil in place. Dry with a hair dryer to ensure it is dry. Spray with clear spay paint. You don’t need a high dollars paint, the cheap stuff works fine. Peel the stencil shortly after spraying to prevent the clear from peeling back. The clear helps define the multi stage carving. It really makes the project pop.
Thx for your tutorial! I did sandblasting in High School. Later had ideas of making 3D pics & this was how I imagined you would do it. The only questions I have is: What kind of sand to use, can you use masking tape, and will a hand held siphon sandblaster work for this? I’m going to be building my own cabinet from ideas I’ve found on the web. Do you need special gloves?
I recommend to use silicon carbide or aluminum oxide with about 150 grit (that is my favorite). Tape for a stencil and a siphon is not ideal. If you did use tape anyway, you would have to layer it at least 3-5 layers thick and it might still fall apart. You don’t need gloves unless you’re afraid of accidentally spraying your hand.
Thx Eric! I appreciate the help you’re giving here…let me know when you put anything new up…Thx!
I have ben trying to find out where to get hydrofluoric acid. I started etching about 35 years ago with it and got it at a stained glass shop now they closed and I have never been able to find it. I do not like the etching cream and cant afford to get the sandblasting. What % would you use the acid in. Thank you for your help. Jane
This is a wonderful step-by-step guide. Thank you so much. I think we all appreciate the time and work you put into helping your fellow engraving enthusiasts.
Hi Eric,
We really apreciate what are you doing for the people interested in sand blasting with no experience.
I would like to ask you how deep, we must carve on a glass window?.
Do you think it’s possible to post a video of the process?
What kind of vinyl it’s adecuate to sand carve, (mil), and where to buy?
Thank you very much.
@ Ariel, it really depends on how many stages you will be blasting. I do have some videos in my membership with more detailed tutorials which is where I spend more time at. You can check it out here: https://www.glassetchingsecrets.com/member/
Hi there. Thank you so much for these emails. I am a complete novice but have recently acquired a sand blasting machine. I have no idea where to begin with it. Do you have any tutorials on how to put it together, what type of air compressor to use, how to connect it to the sand blaster, etc.? These are the things I need to know before I can even begin trying to use your other tutorials… Thank you so much,
Renee
hola Eric.. excelente tus tutoriales , me estoy aprendiendo varias cosas importantes.
MUITO BOM Eric Robert as suas dicas são uma verdadeira aula.
As a beginner in sandblasting I realy enjoy your tutorials there are always something new in it.
thanks Eric Robert,to me this is verry helpfull
Nice tutorial. I did this years ago and am currently gathering the tools to get back into the sand craving. I enjoy creating glass art and am looking forward to it once again.
Thanks Eric, very nice & very informative new learners like me, appreciate
THANKS FOR THE TIP LOVE THE FLOWER. KEEP THEM COMMING. THANKS FOR ALL THE HELP. LOVE DOING THIS.
Thanks Eric, for all the info will try it, it looks great
What CFM is needed at 60 PSI
thanks Eric sir for showing me 3D job but my problem is i am using exposing film for sand carving glass not vinyl so i have to clean the glass twice
is it good to use vinyl or exposing flim pls let me know Eric sir
Thanks for keep on posting info it keep me going and want to learn more. Thanks a million
Love the beginner stages with excellent detailed explanations. I’m a real beginner and these are fantastic. Please keep them coming.
Hi Robert i am happy to received the glass etching samples i real like it
How do you decide which part of the design to carve the deepest?
I could not see the finished version, it dropped out and was not in the frame.
Thank you very much for the information you have sent on sandblasting. I am new to this wonderful hobby and have a lot of questions too many to ask here please send info on how to get your e-book . Again thanks and keep the good stuff coming.
Great info .am looking to sand carve new xperence have commercial blasted many years ago have practicly everything except copier and would be grateful for any information i can acquire.77 yrs and can use all the help i can get
Thanks Eric for this tutorial it’s very interesting and i want to get into this as all ietch with is a dremmel.
I’ll send you some of my work soon.
Thanks Eric, this is what I like to do, I have done a couple of these , right now I’m down I’m having trouble with my air pressure tank, might have to replace it. Thanks again for showing this one. Keeping show how to do the deep sandblasting.
What is the best way to make patterns? I am not very handy with drawing and cutting out. I looked at a Cricket cutter would that work. Many to chose from. Any suggestions, or ideas.
Thanks a lot for sharing. Pls I need more information about sand carving.
How do you know how to number your art work in order to do the layers in the right order. I don’t understand that part a 100%
Thanks, Greg (I’d like to do a blue marlin like the picture you show)
@ Greg, the first/deepest etch is the part that would stick out closest in real life.