Member's Login
Glass Etching Secrets: Learn to Create Etched Art Glass with Stencils & Unique Techniques
  • Home
  • About
  • Etching Processes
    • Sandblasting
      • Sandcarving
    • Cream
      • Free etching cream!
      • Armour Etch Glass Etching Cream
    • Hydrofluoric Acid
    • Engraving
    • Basic Supplies
  • Blog
  • Shop
    • Armour Etch Glass Etching Cream
    • Pressure Pot Sandblaster Plans
    • Make a Mini Sandblaster Plans
    • Vari-Blast Sandblaster Footswitch Plans
    • How to Make an On-Site Sandblaster Plans
    • Sandblaster Tee for Pressure Pot with Conversion Kit
    • On Site Glass Sandblasting Kit- “Vacu Blast”
    • Stencils Shop
    • Glass Paint
    • Sandblasting Rock eBook & Guide
    • Sandblaster Nozzles & Hoses
    • Bottle Cutter
    • Glass Candle Making Supplies
    • Glass Etching Kits
  • Glass Etching Secrets eBook
  • Contact

2 Layer Technique On Letters with Tip

Posted on November 16, 2012 by Eric Robert Posted in Blog Content, Sandcarving Examples, Tutorials 2 Comments

So I have been getting into a lot of fun things lately and recently experimented with my new low cost vacuum on-site sandblasting kit which was inspired by Barry, a fan.

I tested this on the scrap piece of glass today because I was perfecting the equipment and I figured it would be great to share this 2 layer technique tip. If you don’t known what this is, it’s simply the 2 stage sand carving process. The photo shows below what it looks like which gives off a stand out look.’

sandcarved and shaded glass example.

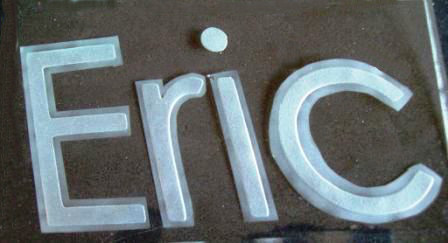
But I have never heard many people using this technique for letters so I thought I would share the ideas plus give some tips. First I sand carved deep into the glass for the first layer. Then, an outline of the letters were cut and lightly sandblasted. It’s best to use a smaller abrasive grit though for the last layer. I used a grit that is probably equivalent to 220 with an additional small sandblaster like the ones here.

Anyway the grit was originally 180 but after many uses, that stuff really wasn’t cutting well and probably broke down to about 220 (I’m guessing). Most people might throw it out, but it works great for light shading and to lightly etch the last layer. I hope you liked my tips. Please leave a comment below and any tips you might have. Thanks


Share this on social media or email by clicking below!
Facebooktwitterredditpinterestmail

Related posts:

What Technique was Used for this Etching? Lowercase Alphabet Letters & Number Stencils Uppercase (Capital) Alphabet Letters & Number Stencils Old English Font Stencils with Alphabet Letters & Numbers (2 pak)
« 3 Roses with Air Eraser
Access Videos and Free Patterns to Use »

2 thoughts on “2 Layer Technique On Letters with Tip”

  1. Doug says:
    February 9, 2013 at 6:44 pm

    I was just thinking about this vac setup you have. Have you tried any commercial projects with it Eric? Looks like a neat idea. Just a word on the Pasche air eraser. I was haveing quite a lot of sputtering and stopping with it, so I plumbed into my my 100 lb. pressure pot. Can you say “Holly $h!t. Does this thing every perform nicely. It’s got a nice wide spray as it carves through the glass.

  2. Eric Robert says:
    February 11, 2013 at 6:02 pm

    I haven’t been doing any commercial projects, but I know it works just like those high priced ones.

    Sounds like a good idea with the Pasche. I thought about giving that a try.

Leave a comment

Your email address will not be published. Required fields are marked *

Sign up

Categories

  • Blog Content
  • Glass Art Spotlight
  • Glass Etching Stencils Shop
  • Other Glass Supplies
  • Other Pages
  • Questions About Products, Etching, & Sandcarving
  • Sandcarving Examples
  • Tutorials

Access Training Material

Order the training materials here.

Search

Copy Code & Add to Your Website
Contact Us | Privacy Policy and Terms of Service | Informational News Blog | Members Login Secure payment by paypal and these credit cards.
Grab a Button
I'm a fan
© Glass Etching Secrets