
I recently received a question from one of my subscribers asking: how do you get 2 different textures, light and dark with etching cream?
Most people know that this can be done with rotary engraving and I have been doing 2 tone etchings with sandblasting through the use of either 2 stage sandcarving or shade blasting techniques.
Even though I use cream etching, I have never tried this so I tested it, and it is possible to create 2 shades.
You can do this by applying cream to two separate areas at different times and leave the cream on much less for the lighter shade. An even easier way is to spread the cream over the whole stencil the second time which is shown in detail below.
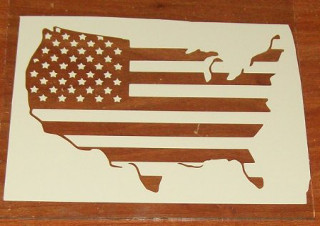
1. Create Stencil on Glass– Pick a stencil that has internal areas that have both a positive and a negative pattern. I created a unique stencil which depicts the country flag on the USA map as shown above.
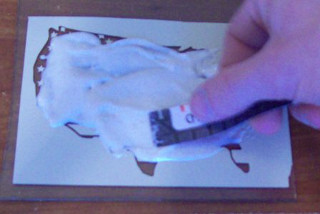
2. Spread Cream Over 1 Shade– With the stencil on the glass, you will first etch the areas that will be the most etched (white). Spread the cream over the whole stencil and wait the typical time set by the manufacturer. I waited 5 minutes as stated by Armour Etch’s cream. After this you need to wipe the cream off and wash.
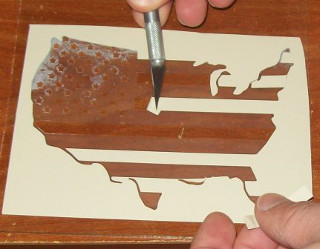
3. Remove Internal Stencil Sections– Now remove the negative areas of the stencil inside which will receive the lighter shade. Once the areas of the stencil for the 2nd tone is removed, spread the cream over both areas inside. Wait for the cream to etch a little less than the manufacturer’s recommendations. This is my first test, so I removed it too quick and some parts were not etched evenly for the 2nd tone as shown in the next step.
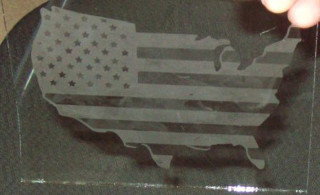
4. Remove Cream & Stencil (Complete)– After you removed the cream and the whole stencil, you can see what it looks like above. I should have waited a little longer and it would have turned out better, but this process works to create 2 shades using your cream! I will experiment with this again and document the recommended time you should wait for the 2nd shade either here or in the member’s area.
Share this on social media or email by clicking below!


fICOU MUITO LEGAL .
Hi, I really find these tutorials helpful. I have seen tutorials for sandblasting and cream etching but I have not seen any tutorials for hand etching with a dremel for example. This is how I do most of my etching and I would like to see some of these techniques, such as creating two shades and multi-stage etching using a dremel.
Hi
Like Renee i would love to see more tutorials on hand etching(i use a Dremel), keeping my fingers crossed
George
Thanks a lot for your continuous support and your help experimenting new(??)technics and teaching us about and showing your results…
You are a big helper for me especially.
I am from Colombia and here is too difficult to have the materials… Do you have any type of FORMULA to prepare the cream for this exercise?
Again, God bless you for your emails and help.
I have done this and it turns out excellent after a bit of practice! I am into
using the dremel now and would really like more tips on the shading, etc. with
the dremel
have done this but not on purpose, thanks for explaining how to do it
@ Luis, I don’t have a formula so I just buy it. Some people have made it with the dangerous hydrofluoric acid but that is scary.
Thanks Eric…
I will be trying this on my next wine glass project…**wish me luck**
from the pic I could not really tell/see the difference in light/darker etching, but do appreciate you sharing the thought and process.
Thanks for sharing, will be trying this soon and will let you know how it turns out. i am only into cream etching.
Thanks, It worked fine I tried this procedure by acid HF you are right timing
on different template has to be carefully taken. Thanks for sharing.
@ Etcher, yes it isn’t very noticeable because this is the first time testing it and I should have waited longer. I didn’t do a good job smearing the cream on the bottom half of it because I was just fooling around with it.
If you look on the top half, you can see it more though.
Eric, I hope you do not mind if I answer Linda about using an electric tool for etching and shading. Linda, you can do some outstanding work by combining etchall creme etching with an electric tool. You etch first and then comeback on top of the etching using the electric tool for your detail work and shading.
Your electric tool will just glade over the etched surface. It is fun to use pen and ink to make your shading on the etched surface also. Have fun…<