
Before I showed you a simple way to personalize glasses which can make a nice gift for someone by etching a glass candle (link). In that post, I explained some tips to help make your etching stand out and be noticed. One tip is to engrave deeper, and another is to use only darker candles. A darker candle can either have a darker candle wax or a dark colored glass. It doesn’t matter as long as the background is dark because it will help the white, frosty etching pop out. Also, some supplies (link) will provide you with paint to rub on over the frosted area. Some kits have it and others don’t.
In this post, I wanted to show you an example of what I am talking about, and show how bad it really looks when you etch on a lighter colored candle. To show you what this looks like, see the provided example below. The color of the candle is a creamy or off-white and a design is etched on the front of it.
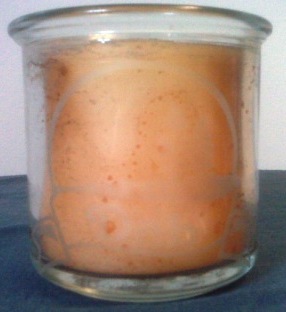
Doesn’t look too good, does it? I hope these tips help you etch better items!
Share this on social media or email by clicking below!


I do hand engraving and would like to find a dimond pencil i had one years ago and can’t find one.My work is on display at tom hollingsworth on facebook
Diamond tip pencils are still around. Just do a search for “diamond tip pencils.” They run up and down from twenty-five dollars. Here is one on Amazon:
http://www.amazon.com/Graham-Field-Diamond-Point-Pencil/dp/B001L3JBNW
Moisture will be a problem with even expensive systems. There are many things you can do to minimize the problem of wet, clumpy sand. For example:
1) Drain your compressor regularly, especially after long runs and use on hot days.
2) Air movement creates a lot of friction, friction creates heat and heat results in condensation. A larger compressor has less trouble with condensation, since running air compressors generate a lot of heat and bigger ones tend to have to run less.
3) Larger tanks have less of a problem with condensation from heat (more surface area to dissipate the heat). There is nothing prohibiting you from adding a bigger tank, or several smaller ones joined together.
4) Of course, the best thing is to avoid it to begin with, such as by keeping your sand covered and sealing it when not in use.
5) As Eric noted, filtering the air of water will solve much, if not all the problem. The expensive systems depend on filtering to avoid pushing moisture through tools, paint guns and so forth.
How are you draining you compressor please? Do you have a special drain tap as if so, mine does not have one.
Tony, all compressors should have a weird looking drain tap at the bottom of the tanks. I recommend that you drain it almost every time you use your compressor or every few times. Especially if you use it for more than a half an hour and on humid days. Is there at least some kind of drain that you can use your wrench to take off?
That seems very odd. Let me know
Eric,
The stanley bostich compressor I have does not have a drain plug, so I went out and bought one that did. Can’t be doing with having a compressor burst due to water build up !
Tony, I can’t believe it didn’t have one. That is very strange. I wonder if there was some kind of unique way to drain it. Did you take the other one back? If you couldn’t, you can always drill a hole and use a tap to make your own threads. Then place your own plug on it or you could just screw a bolt up there. Let me know.
Cheers
-Eric