
There are a lot of people that want to get into sandblast etching (link) but don’t want to invest in large blaster equipment, so I decided to point out the different small sandblasters that you can use. These mini sandblasters are less cumbersome, cheaper and don’t require as big of an air compressor. Listed below are some of the available blasters in the marketplace with included links showing where you can get them.
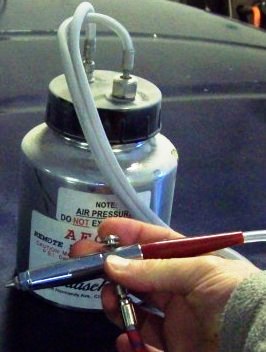
 Paasche Air Eraser Kit– The Paasche air eraser usually costs around $70 – $110 for the kit, but you have to order the air compressor separately (as do all the others). It is recognized as a quality name brand for smaller sandblasters. Paasche also makes airbrushes for painting which will not work with sandblasting so be sure you pick the correct one. They look similar in appearance.
 Paasche Remote Air Eraser Etcher Kit– (After purchasing this, I strongly discourage anyone from buying this.) It has poor blasting power and the abrasive always lags behind. It is another brand made by Paasche with a larger container at a quart large and costs around $90 – $140.
 Larger Paasche LAC #3 Air Eraser– The third type that Paasche makes is a little bit larger in general. If you have slightly larger projects, you might want to check this one out too.
 Badger Mini Sandblaster Set– This is another different type by Badger and costs about $40- $60. It appears to be powered by aerosol cans, so you don’t need to buy an air compressor. I’m not sure if it has an attachment to connect it to an air compressor, but I am sure you can rig something up to fabricate it to work. It requires very fine grit of 220 and finer.
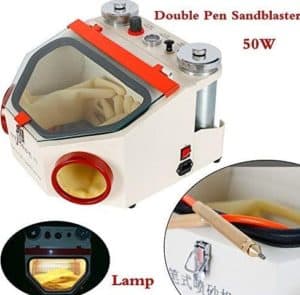
Dental Pen Sandblaster with Cabinet: Although these are manufactured for dental cleaning of items like dentures, they work great with fine aggressive abrasive also. This link shows one brand but most of them came from the same factory and you can find other brands here.-

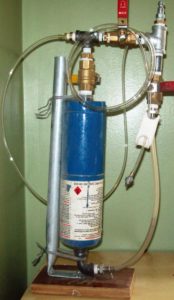
Make your own pressure-assisted mini sandblaster: I have also made my own pressure assisted mini sandblaster. The benefit to this is a more reliable stream of abrasive like the pressure pot sandblasters. You can see a brief example of making the inexpensive nozzle here and the whole plans here.


All these are sold through Amazon.com. You can visit the pages by clicking the above links. Please leave me a comment, any reviews of these (I haven’t tried all of these yet), and let me know if I missed any. Be sure to bookmark this page for future reference and ask me any other questions.
Share this on social media or email by clicking below!

Eric, We have a Paasche AEC-K Air Eraser,I have only used it once and it worked great.
The only downside that I see is you have to keep adding compound because of the size.
Katherine, thanks for the reply. I hear what your saying about refilling the container. Its ridiculously small, thats why I suggest the next one down (Paasche Remote Air Eraser Etcher Kit) becuase it has a nice large container. These would be great for shading also.
Thanks
It looks good. only thing I do not know whether Amazon can dispatch to India because of Import regulations. Any way I will try sending them a mail.
Bharath Kumar
Eric. like you I would much reather spend a little more for a larger container, so I got the Paasche Remote Air Eraser Etcher Kit, it works GREAT>>>>>>>>
Thanks for the info, Its great working with yall (its a southern thing)
thanks Eric
John, that one definitely looks like one I’d like to have and thanks for the review (I haven’t tried every sandblaster known to man). lol, I hear the word yall every once in a while.
@ Bharath, I decided to do some research for you. Amazon ships International but some items might be a problem or if they are larger items. It sounds like they will tell you if you can or can’t when you fill out your information before you buy.
Harbor Freights has one for only $19.99 Item #99636 Just got one today. I have one I made out of worthless airbrush. A C Moore’s sells a fine sandblasting abrasive. You can go on their website and get a 50% off coupon. Deal is just one a day. Hey every time I go to town. Hey if I can get a deal I’m going for it. Have a good one, Ron
Thanks for the information… Where would be a good place to get the compressors?
Thanks
Kenji
Been using an air eraser for many years…Paasche version has been an incredibly unreliable, inconsistent piece of crap. I bought a generic version and was so much better for a quarter the cost! I use high air pressure to get fine details so this is taxing on the tool but the generic held up for longer and worked better.
Decided to give Paasche another shot with the remote version—-tried it today and it doesn’t work! Then in an attempt to get something to happen I went above the 50psi and the container popped and bubbled, so I’m guessing they’ll say I can’t get a refund, but we’ll see—it didn’t work to begin with. I’m in the middle of a big commission and all my erasers are toast so I was planning on finishing up with the remote version but now I’m stuck with another Paasche dud!!
Kyle, lol- thanks for the review.
Thats a surprise for me. I though they were a quality name brand- but I guess not.
Its good to hear from you also. I hope all is well.
-Eric
Hey Eric,
All is going well…staying pretty busy with work and have made some pretty cool new things.
As far as Paasche I know they’ve been around for a long time and they must have a good following—maybe their airbrushes are good? I’ve seen other people use the air eraser and seem to have good luck but when I compare the lesser expensive and more reliable generic, then that’s where I’m going! And receiving a remote unit that won’t spray is a real bummer.
Hi,
I seen a video on youtube and wanted to know how they did the “Etching/engraving”. Can this be done with the Air Eraser Kit and or what media will make it look like this? When I see other videos of etching work, it looks like the glasses that have been etched are frosted. Or again does it depend on the media that is being used. Please help.
Thanks
Stephen
https://www.youtube.com/watch?v=V03lja7cK2Y
Stephen,
All of these including the Air Eraser Kit will etch the glass but most of these are siphon sandblasters so it might not etch as deep. To achieve deeper etchings, we typically use pressure pot sandblasters.
Some people use etching cream and it somewhat does look like frost sprayed glass. Or it could have been sandblast etched with a light pressure.
Very good article.Much thanks again. Cool.
Eric, I bought #1, it worked great; but after the third glass it stopped working. i cleaned and washed it but to no avail. I also bought the Badger Mini kit but as you know the canister is not refilled, so i am back to using Etching Cream.
I just love to look at your articles and get advice from you. Thank you.
Yeah, I think it’s safe to suggest that people shouldn’t buy these air brush style sandblasters now. Everyone, just buy a regular sandblaster size or a handheld one with a smaller tip.
As Kyle said above, the remote one is junk because I finally tried it. It looked promising. Maybe I can improve it and make it into a mini pressure pot.
The only one I think might be worth the investment is the third one (Paasche LAC#3 Air Eraser).
Hey Eric……….I’ll have to agree with you on the Passche remote air eraser. It’s very inconsistent with amount of sand it pushes. I added a long perforated plastic tube to the inside lid and it did seem to help. I was also going to adapt this one to a pressure pot.
Harbor Freight has a copy of the Paasche air eraser, a copy down to the color of the handle. The HF version seems a bit more agressive than the Paasche, blowing more grit (bigger nozzle maybe?) but really works quite well for very small scale etching glass. Tends to plug, that could be an adjustment on my end, I haven’t played with it all that much. Anyway, a very nice pretty much complete kit including a bottle of 220 grit abrasive.
Thanks Norm, someone else told me that the generic version worked better also. I might have to check it out. Thanks
I bought a Paasche Air Eraser – piece of junk. I just picked up the Harbor Freight one, I’ve heard it works alot better & if you want more flow, there is a screen, with three holes & if you widen these; you will get more flow; this is what I’ll do. Also …… depending on what your using, it has to be 100% dry, so guys suggest baking it at 225 degrees, for 25 minutes & sifting it through sreen, to avoid clumping, also; it helps to have a moisture trap/filter on your airline; or even better; an in-line air dryer.
The above should read, sift your Material, ( Aluminum Oxide, Etc. ) through a SCREEN – I’m using a cheap Splatter screen, meant for the Kitchen; for what I’m using this for ( Fossils ) ; I’ll be using Dolomite Powder, which is really fine; but if your using a heavier grit; just try & find a screen close to the particle size & use that to sift your material through it ….. & …… keep your sand/powder; in a airtight jar; to keep moisture out.
I have used a w.r. brown mini blaster model #HS342 for around ten years long enough to have used up 13 replacement tips. I trashed the small glass media jar and plumbed the sandblaster into a small blasting cabinetmuch like the large commercial set ups. I use a 1 gallon shop vac that exhaust through the back of the cabinet to keep the media dust down. Replacement parts were at one time available through Federal Equip. Co.North Chicago Illinois (also known as the Speedy Sprayer Co. but the unit is so simple common size o-rings are about the only items I have ever replaced. After going through the number of tip I had a local machine shop turn 3 titanium tips – that was 3 years ago and I have yet to change the first tip. I use 220 grit alum oxide @ 30 – 40 lbs of air on average .
I have just started to do etching on glass. I purchased a Masterbrush mini sandblaster/eraser and it works great. I am an aerospace coatings instructor and the Master has done a great job so far. It only cost about 40.00 from TCP Global, well worth it.
I bought the Harbor Freight Central pneumatic Air eraser kit from HF. but I have not baought a compressor, because i got a bit confused. It says 1-6 Gal not recommended , 7-29 Gal intermittent use. Average air consumption 4CFM at working pressure 65 psi.
If I look at these specs, you need a pretty big and powerful air compressor. with a big tank. not really what I want.
Does anyone has good experience with small compressors, for removing paint of metal parts such as camera parts / Models ?
Compressors come in two sizes, too small and too large. These little “sandblasters” are like opening up the end of the hose – they go through a lot of air. My advice is to get the largest compressor you have room for. Of the Harbor Freight compressors, it looks like the 17 gal. 1.8 HP 150 PSI Oilless Air Compressor would be a good fit. It won’t be continuously cycling, not too big, large enough for future additions to a pneumatic tool, collection. Portable and I prefer an upright because of the smaller footprint. Oil less is good for what you are doing, no contamination of the grit or if spray painting, the paint. For the delicate parts you are working on, you might want to look at the soda blasting.
Don’t forget that you will probably want to contain the grit/media you are blasting. It goes everywhere. The 40 Lb. Capacity Floor Blast Cabinet is my third cabinet, after fairly extensive modifications, it pretty darn good. You will also need a fairly heavy duty vacuum cleaner to keep the dust to a tolerable level in the cabinet. The air eraser is only the tip of the iceberg.
I’m not sure if I had mentioned this before somewhere, but I’ll repeat it again. I had 2 Paasche Air Erasers. Both with the aluminium pots. And like above tried to get a little more pressure through it and hopefully,better flow of grit, to no avail (boom). So I gutted it and ran the plastic hose right through to the tip. For air pressure and grit I just went directly to the bottom of my 10 lb pressure pot with my 60 gal compressor. No more problems. I also made some improvements to the pressure pot, such as installing a perforated copper tube attached to the the exit side and a short piece of metal brake line from the bottom of the exit and going into the perforated tube. It will cut right through glass.
Hi Rick, could you please tell us which compressor you are using? I also plan to clean fossils. Thanks a lot!
How do you “widen the holes” of a mini air eraser? I have 70 grit AO and bothing is coming out!! So frustrating.
I have the LAC 3 and keep having an issue with moisture build up. I have a filter on my compressor and not sure what more I can do. Any tips would be greatly appreciated!
Where can I get the tips for my mini sand blaster because mine need a replaces
@ Jo Anne, if you are referring to the AEC air eraser (top one), the tips can be purchased here: http://amzn.to/2F2bJvg
I have 3 paasche air erasers, including the remote tank version. They work fantastic for what they are designed to do and they are the only brand I trust with irreplaceable antiques, rare fossils and anything else that is too expensive to replace if a mistake is made. You must use media that is less than 80 micronsin size. 50 microns or smaller is the best. Regular sandblasting media will not work in these, the particle size is too large. If you want to use cheaper media you’ll need to buy an 80 microm (200 mesh) or smaller sieve to run it through. Out of a 25 pound bag of normal 240-600 grit aluminum oxide sandblasting media you can expect a few pounds of it to be small enough to work with the air eraser. Your better off buying the Paasche brand. They are for fine, delicate work only. It takes a long time to blastan area of just a few square inches with the aluminum oxide fast cutting 240 or 400 grit. Baking soda is for cleaning, it doesn’t “sandblast” And is slower by a factor of 10 compared to the aluminum oxide and it won’t remove paint, heavy rust etc. It takes awhile just to start seeing any cleaning work being done with one. It to must be run through a 80microm or smaller sieve, it also must be also must be dried before use as it absorbs moisture quickly. Baking it in an oven at 200 degrees for 20 minutes is a good starting point.
The cheapest harbor freight models may look similar and appear to work better but they aren’t the same tool, they mini sandblasters. They will allow much bigger particles through and are far too aggressive for the type of work an air eraser is used for. It’s called an air eraser for a reason. They use “compound” instead of media (I know it’s the same material) and the wording is different from sandblasting to drive the point that they aren’t the same thing.
The remote tank works very well for me, I made the same mistake though and ballooned out the bottom of the tank my first time running 240 grit at 65psi. I didn’t read the instructions and figured it would be OK as I run my other air eraser atthe same psi for more “aggressive”work. My mistake.i put a steel bar accross the top and used two pieces of threaded rod drilled through the table to bring it back into shape.i keep the bar and rods in place if I need more than 40psi from it. Once distorted a vessel never has the same strength. I can use it at 60 psi this way but I don’t recommend it.
It’s not a bad idea to dry your aluminum oxide material if you’ve had the jar open dozens of times and it’s half full. Definitely do it if you reuse any of it. Higher pressure use with aluminum oxide wears out tips faster than an etching compound. If it’s not working properly that maybe the cause. I’ve had two of them for over 10 years, other than tips I haven’t had to do replace anything else. I don’t use it everday, sometimes a couple weeks will pass between use.
If you want to “etch” glass with simple shapes as quick as possible you’ll probably want s different tool. The air eraser would bankrupt you in no time. It leaves an absolutely beautiful finish on glass and its as accurate in detail as the artist using it. Its also very, very slow. The harbor freight is better suited to that work for it’s aggressiveness but mine didn’t last very long. After 18-20 hours use it was shot, literally worn through on the inside. I use a bigger sandblaster with the smallest tips when I need to actually sandblast and the rough finish and uneven material removal doesn’t matter. It’s easy to take a few thousands of an inch off a steel surface in a couple minutes using a traditional sandblaster. It would take hours to do a fraction of the area with 240 grit AO using the air eraser. It cleans and etches, it’s not a sandblaster. Almost every negative thing I’ve heard about these is due to expectations being beyond the products capability or from misuse.
mall area