
Today, I am going to talk about problems that you may have with stencils. Have you ever tried to place an etching stencil on a piece of round or curved glass? Sometimes it can be a pain to get it down all the way because the stencil itself is flat, without a curvature. For example, if you place the stencil on a wine glass where its shape is curved horizontally, and also curved vertically, it can be a problem, and the stencil will usually have ripples on it. When you do decide to start etching, the abrasive or cream can get under these ripples. Not good, right? I decided to include a tip here to overcome these problems.
 When the stencil has a ripple at the edge of the etching area, you can take a razor blade or exacto knife, and cut a small slit in the ripple. Then, fold the flaps generated from the ripple over each other. There should still be enough adhesive on the stencil to adhere. Make sure you press them down securely so that the etching doesn’t take place there.
That’s my tip of the day to overcome a problem with muti-curved glass surfaces and stencils. Leave a comment below if it was helpful.
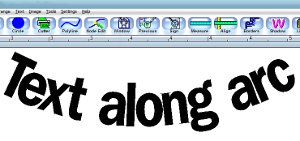
Update: A lot of times when you place on a larger curved glass, the text will not look straight. To make the stencil text look straight, you have to mark the arc of the curve with paper, and bend the text with your computer software. That way, when it bends around the curved glass, it would look straight. I created a post that talks about the best way to apply it around round glasses in more detail, or you can become a member and watch the video of this here.
Share this on social media or email by clicking below!
this is what I have been doing I was wondering if their were any other help thank you for your help