
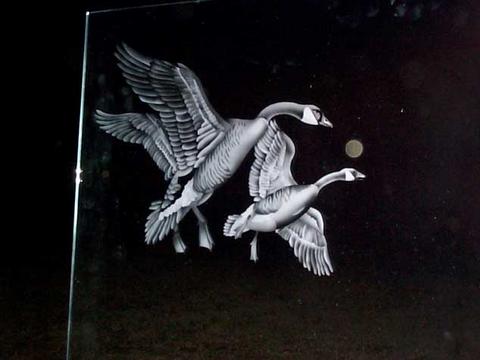
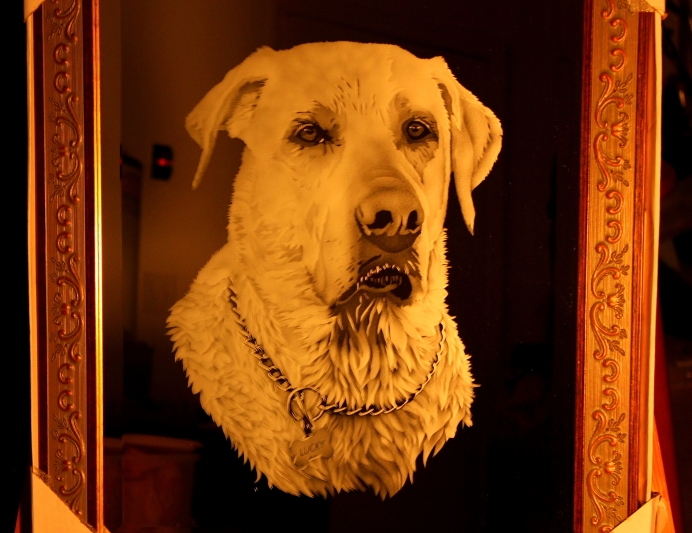
 This post is by Dave Schulte. This is a mirror I did for some friends in Texas who lost their prized quail hunting dog and family pet to a Rattlesnake bite. (Large photos are shown below) This project was all hand cut on a regular paper resist that was glued down over masking tape. The mirror was first covered in 2 in. tape slightly overlapping. This is really not a good way to cut a mirror as you are cutting through two layers of material but it was all I had at the time.
You can go to a printer and have your image printed on adhesive backed Avery vinyl to any size you want as long as you start with a high resolution picture suitable for blowing up in size. Once to size you need crisp lines that you can see to cut.
I don’t number my work but use a system that works for me by simply analyzing the picture first into 3 shades. White areas, gray areas, and black areas. I blast in this sequence also starting with all areas that are white (full frost) followed by gray areas (partial frost) and finishing with black areas (glass left un-blasted and clear). Once you gain some experience you can stretch your blast to about 4 levels of blast but that’s about it.
I use a pencil type blaster with very small tips (measured in the thousandths) which shoots a very fine stream of abrasive. This is needed for very fine detail and tight areas of blast to minimize over spray. I blast at pretty low pressures using 220 grit aluminum oxide. I don’t blast in a cabinet either. I blast outside on an easel on nice days. With the blaster I use the amount of abrasive needed for a whole 16X20 mirror is probably about 3-4 ounces. This gives me a lot more freedom to see the work and blast and peel as I need to.
Share this on social media or email by clicking below!

Beautiful work. Very interesting. Keep it up.
OMG!!!Very beautiful work, so realistic. Do you have any videos doing any of your work?
Your work is beautiful. I’ve only started to sand blast and maybe one day I’ll be half as good as you. I’d also like to know if you have any videos of you doing the pictures? You’re amazing.
Awsome stuff
Fantastic work.
Thank you for sharing.
Very nice work your doing. I my self have started blasting right off the bat. Also I use 2 inch masking tape but I double it and then I trace cut what I want to etch. I still need a lot of practice on shading.
thank you all. No videos yet but I may be able to whip something up in the near future. Here’s a hint….watch some videos on Youtube about airbrushing with stencils…very similar. I use a micro blaster with very small blasting tips…the kind used in precise jet blasting found in several industries. The tip inside diameters are measured in the thousandths. This allows precise control for shading small areas.
Awesome!
Wow! Beautiful work. What a nice thing to do for your friends who lost their pup.
Hey Dave, would you mind sharing how long it typically takes to etch these masterpieces?
I would guess at least a full day. Is it less, more?
Thanks again for posting!
Well it differs depending on the number of cuts, but generally it takes 4-8 hours to blast one. Usually I don’t do it all in one sitting but on occasion if I’m feeling froggy I will…..:) Takes quite awhile to cut them all out too. Some mirrors I may have 10-20 total hours or more in.
Fantastic art
brilliant work there is nothing over in the uk to match
takes a lot of patience
You are indeed an artist – This is so beautiful! Animal lovers will pay any price for something this beautiful and timeless! This is a “painting” that will never fade . . . I am going to make certain I have perfect photos of my dog before she passes . . .
David!… Beautiful work! Did you say you’re using an air eraser?
“This project was all handcut on a regular paper resist that was glued down over masking tape.” That Sir, is priceless. From such humble beginnings, you bring this glass to life. Well done.
PS. Where do you get your blasting tips?
I use this type of tip made by Comco
http://www.comcoinc.com/products/nozzles.cfm?page=nozzles
Great work! I image the tough part is picking which shaded areas get what attention. Something that will save you hours is a vinyl cutter. I use one thickness of regular vinyl to even do stage carving. Hope you do make a video to share. Please continue to share your projects.
The cutting is the long and boring part. I wish i could find a computer program that would cut them the way i want them cut! Lol. Problem is i dont even know until i get into it and start to analyze it. Faces are the toughest to do.
Dave, I figured it probably varied between 1-2 days. Sounds like fun though.
Interesting about that nozzle. I currently use about a .094″ tip but will get a smaller one next time because they wear out so quick with the higher pressures. You probably don’t have that problem much with those lighter shading pressures.
Dave, if you can use Adobe illustrator or any sign software, what you draw is what you cut. Once the machine cuts it you apply an application tape over the top of it. Apply to the mirror or glass and remove the application tape. All the application tape does is hold all the cut pieces in place until the vinyl pattern is in place. From this point it’s just like you are doing now, remove the section or pieces that are fully etched or shaded. Next the lighter until the only thing left is areas you didn’t want blasted. You would be surprised the detail you can draw and cut with a vinyl machine. What you do is fantastic, but there are tools that make life easier. With the quality of work you do and attention to detail you are one of the GREATS!
thanks Ernie!! That sounds like what I need. I guess I’ve got some internet surfing to do. Are they expensive? Who makes a good one? Any help would be much appreciated. Thank You, Dave
I have Eric’s book and I got a cutter from uscutter Works great and not expensive.Thanks again for sharing!
Thanks Hope. Dave, inside the members area, check out module 2. It talks about them and how to save a lot of money. My set up with all the software costs less than $250. This was one of my so called secrets that I shared but getting it at that price seems to be unlikely these days. You’d be looking at spending about $400. Although there are some cheaper ones, I am not confident they are good enough quality yet.
Ok thanks. Is there a way in illistrator to disect an image down to shades and actually get a cutter that will cut minute pieces? How detailed can you get with them? Any examples floating around to look at?
In addition to Illustrator you can use Scoreless draw, and you are supose to be able to cut from that software. I paid more for my machine because I started doing vynil signs. My wife and I got into stained glass and used the machine to make patterns which has made a world of difference then started etching. Machines come in widths from 12″ up to and over 60″. It depends on the majority of your work. I have a 24″ and have etched wndows over 4′ wide. It can be done by making panels. I could go on and on, but what ever cutter you get be sure there is a company you can go to IF you would ever need service. I haven’t had a problem with mine in 12 years but I have heard horror stories. My cutter came from a company in Texas called Sign Warehouse. If you interested more details feel free to email and I’ll give you my number. Sallie.ernie@gmail.com
Auto spell check… should be Corel draw.
Here’s a single staged etching of a mermaid I did. It’s 5×7″.
cuttingedgesandcarving.com/forums/index.php?showtopic=15454
can’t view it because I’m not a member
Sign-up is free and a lot of members are really helpful
I forgot i was a member!! Lol! Saw it and its very detailed for a plotter. I guess i need to learn some software!
Dave, you have my email from a previous post. If you have questions I will be glad to help in any way.
Ernie
Thanks Ernie! I really appreciate the help
WOW!! This is awesome work man1 You have given me something to aspire to. You have most definately got the “touch” and “eye” of a great artist So far I have working in a single plane and I cannot believe how amatureish and flat it looks compared to the stuff you do. God bless you and your talent.
Thanks for the kind words. Keep at it. With the right equipment its not that hard.
Lovely, I still cant work out what the print on avery does, are you doing cuts from the print? The pencil blaster, is that a PAB Gun please or something you have invented?
Stupid questions I know but have to ask
yes you actually hand cut the design on the vinyl and peel a piece at a time and blast it. The blaster i use is a pencil blaster i bought years ago from crystal galleries in covina ca.
Thanks for the reply Dave. I’m in the UK so if you have a url or a photo of this pencil blaster I would appreciate a share. Is it smaller/better/same as, the PAB gun?
I had a look at the comco link, is yours like their microblaster please?
There is such an a rray of stuff available in the USA that we just cant get without importing it and then it just cost too much to pay for.
Tony, if I was gonna buy a new one I’d look at this one. Alot of good feedback on this unit and I’ve talked to these folks and they are great. The unit is priced right and if it cost you an extra 100.00 to ship it there it still would be worth the money. http://www.vaniman.com/product_info.php?cPath=1_66&products_id=196
The pab gun is great too but very expensive since you have to buy the abrasive resevoir separate. This is an all in one system and works good.
I just could not leave your web site before suggesting that I extremely loved the usual info a person supply on your guests? Is going to be again frequently to investigate cross-check new posts
david, i am in jacksonville and need a plate slot cut into a 1/2 thick glass shelf. is this something you could do or have a suggestion?
how big is the slot? Length and width?
Dave,
This is a beautiful piece of artwork. I thought at first this was a painting and man was I surprised! You are truly talented.
Also, thank you so much for recommending our product. Coming from an artist like yourself means a lot to us. Keep up the good work!
Regards,
Kyle Galenza
Wow, The detail is so amazing, i find it hard to believe it is etched, you sir have mastered your craft,
Is there anything you can recommend , such as a book or video tutorials that i can purchase to help me do this kind of work, i’m 68 years old, and probably don’t have 20 years to master this art form, however the challenge to get even remotely close to your expertise will be enough for me, my only experience so far is single shading type stuff, that i do on mirrors, to but into frames that i design and build,
Thank you for inspiring me,
Vince Rappa
Que belo trabalho.
Dave your work is wonderful. It has inspired me to try and do some of my own. But, I have been struggleling with….grit medium …. power…. broken mirrors…. Please I need some advice. Each piece I do gets worse.
Can you tell me what kind of blaster you use? How much PSI ? I see you use 220 grit. I have tried 180 and even 120 because I cant seem to get it to carve into the glass or mirror enough. My compressor put out 125 to 150 PSI, but it still feels like it is just spitting out grit.
I could use some advise before I completely give up.
Thanks for anything you can pass along.
Diana
Hi Diana……….What type of blaster are you using? Your PSI and and grit size should be doing something. You are blasting from the back aren’t you? Here’s a link to the blaster Dave uses. http://www.comcoinc.com/products/nozzles/?page=nozzles Hope this helps some.
Yes please let me know what type of blaster are you using? I only blast at about 40 psi and sometimes down to 20 but you need a pressure type blaster not a syphon gun. Big difference!! A pressure system uses a bottle of abrasive that is pressurized and forces the abrasive out a thin rubber hose and thru a tiny tip.
Handcut and not rapid mask Dave? Amazing.
Was the chain painted on afterwards of blasted also?
Have you ever done a human halftone on say a wine glass or other vessel?
it’s great.You are a MASTER.please tell me where to get training videos the entire process.I apologize for not proper English.I use a translator.Eric thank you very much for your blog.
Is this blog still active? Eric are you still admin here?