
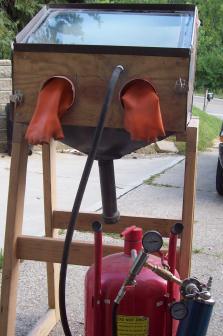
- One way to get a cabinet for a siphon system is to make your own, which may not cost you anything if you use materials from around your house for it. These can sometimes be made out of junk that you actually would like to throw out. When you’re using junk and making it into a functional unit, everyone wins. It allows you to get a use out of junk lying around the house (cleaning it up a bit) while recycling the earth’s resources. Building a cabinet is a great alternative because it allows you to get the size exactly the way you want it.
- Just buy an inexpensive siphon cabinet system from the right places. I have found decent siphon sandblasters at inexpensive prices. The place that offers low priced sandblasting cabinets with the siphon system built inside it is Harbor Freight Tools. These can be sold for as low as $150. This includes the cabinet and the whole siphon system (Nozzle, abrasive hose, container area for abrasive). The only other items you need are the air compressor, abrasive, and the air hose. These systems work by having an abrasive hose connecting the nozzle to the bottom of the cabinet where the abrasive constantly gets funneled down after being sprayed.
- A Third way to get one cheap is to buy a used one. There is bound to be someone trying to get rid of their cabinet. Check your local newspaper in the classifieds section or any other publication, and check Craigslist at www.craigslist.com. Last time I checked Craigslist in my area, I saw a few that were cheap and actually very nice. One was around 40 bucks and in good condition according to the description and photo.
You can read more about equipment used for sandblasting in the link here. I included a list of items that you typically would need.
Share this on social media or email by clicking below!

You can pick up just the blast portion of the siphon system at Harbor Freight for two songs and one dance.
After you have the [ceramic] blast nozzle, a mere five gallon, plastic bucket will function quite well for holding and feeding your resistance. You can pick up the tube that will mount on the bottom of the bucket from a well equipped auto supply, a hydraulics place or any place that sells a good assortment of hose fittings.
One advantage of the five gallon bucket is you can keep a lid on the contents to minimize moisture absorption.
I started with a Sears siphon system. I upgraded to a metal drum, which I adapted, as described above. The drum I found was ideal. It was a low, fat, approximately twenty gallon munitions container. Because it was metal, I was able to mount wood handles to the back and add axles at the bottom. It would hold a hundred pound bag of sand just fine.
One more advantage of the metal container was I was able to add an electric BBQ starter (I reduced the input wattage) to heat my sand, to cook out moisture that collected there on occasion. Too, the wide lid made it easy to fill.