
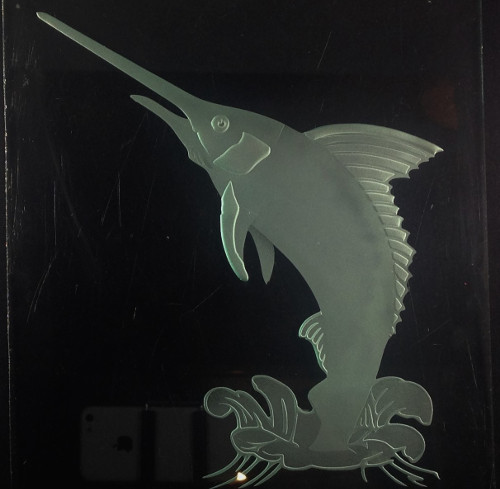
Stage carved etching of a marlin jumping out of water.
I tend to find a lot of cool free patterns using the techniques I discussed in the membership site here, and I like to experiment with some of them in sandcarving projects on scrap glass.
I recently discovered this pattern of a marlin jumping out of water (I really like etching ocean scenes) and tested it by doing a little multi sandcarving (which could probably be considered a double-stage since it isn’t very deep).
After doing this project and seeing some mistakes, it lead me to do this write up to point out some suggestions to help you create outstanding sandcarvings:
- Use Thick Glass: it’s usually best to carve on thicker glass. I was testing on scrap glass of only 1/8″ thick so I couldn’t really carve it as deep as I’d like. I’d say 1/8″ is probably the minimum thickness for light carvings.
- Use Proper Abrasive Grit: I only had 180 fine grit at the time of this test project so it didn’t cut into the glass well. There are some benefits to carving with fine abrasive, but it’s probably best to use something courser of at least 120-150 grit. Otherwise, it could take awhile to carve deep.

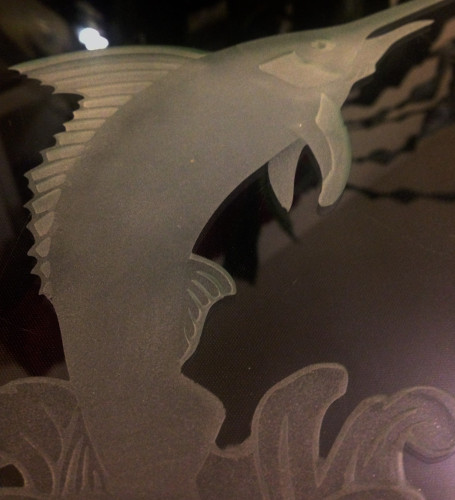
Close up of the back side of the glass where it was etched to show you how deep I carved it.
- Newer Abrasive: I was realizing that part of the problem the abrasive didn’t carve deep is because it was near the end of it’s life. If your abrasive starts to etch slowly and is looking powdery, it may be time to get new abrasive. I found that old abrasive is actually great for using in my mini sandblaster on shadeblasting type projects.
- Carve Deep: you will realize that my marlin pattern wasn’t carved very deep. When you are carving layers, you should aim to carve them deep to really make your project pop. The lighter the carving (like my experiment here), the less of a 3-d effect it will have. It really does look better when it is sculpted deep.
- Add in Some Shading: you can still use some shading techniques in your carvings. I didn’t do much shading here but some of the layers were etched lightly to resemble shadeblasting. It can create some interesting effects to your carving.
That’s all for now. If you have any other tips or suggestions you’ve learned, please post them in the comment section below. Any questions? Post those as well, or check out my free simple sandcarving tutorial here or the tutorials on Module 3 of the member’s area here.
Stay tuned to my next post which will show you an experiment of using our new permanent glass stain paints with this sandcarving project.
Share this on social media or email by clicking below!

where do you get all of your stencils and what thickness are they ?
BEAUTIFUL. You are good.
Have done this many times myself. The problem being that once you clean up your project and realize that the depth is not what it could be, it’s too late, you can’t go back and fix it
. So to all newbies, when in doubt. . . keep blasting (as long as your glass is deep enough)!
Very true Nadina! Thanks for sharing
@ Rick, I cut all my stencils. Can’t recall how thick it was for this project, but it might have been three sheets of 3 mil vinyl put together for a total of 9 mil thickness.
These are really cool
This is really good! I’m able to see the 3-D effect on the glass. Been doing single-stage sandcarving now and then. Your blog encourages me to try this method. Thanks for the tips provided. Appreciate them.