
We have discussed shadeblasting in the past and featured some pros with their work here on the blog. When I first started etching in the glass sandblasting hobby, the sandcarving process was what I was most interested in. However, the shadeblasting process has really caught my interest lately, although it is relatively new to me.
Shadeblasting Glass Etching Takes Practice
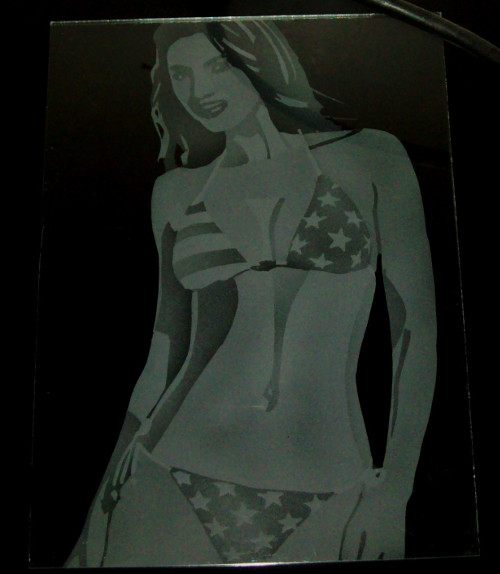
The below is one of my first shadeblastings and was more of a test on a scrap piece of glass. Skills definitely need to be improved here, but it isn’t too horrible considering it is my first completed example. This shows that even though it is one of the more artistic glass etching techniques requiring skill, a beginner can etch pictures on glass with shading techniques and hone their skills to become great with less time than you may think. I plan to etch more pictures with this technique in the spring and summer to improve.
I encourage everyone to give it a try and hopefully you will be open to share your work with us on the blog!
Learning From Mistakes
I didn’t spend too much time with my example since it was just a test to help me get a handle on how much of a pressure/abrasive mixture can produce a correct shade. I suggest on your first few pictures that you just use scrap glass and use it to build up an understanding on this process. As they always say, “Practice Makes Perfect”. Don’t get too picky starting out and use the scrap glass project as a learning experience.
Feathered in Contrasting Features Needed
After I was able to complete my first example above, visualizing this allows me to see that some of the contrasting shades in places like the hair, inner elbow, neck and chest need to be feathered in more.
Smoother Stencil Cuts Needed
Another improvement I need to work on is the stencil cuts on the outline of the body. You can see some of my manual cuts are a bit jagged so this is something I will need to pay attention to more in the future.
What Are Your Thoughts? & Sharing Your Shadeblastings
I’d like to hear from you in the comments below! I know many folks on here may have a lot more experience. What are your suggestions for improvement? This not only helps me, it also helps others on here that can learn from past mistakes of examples and improve.
Also, we would love to feature your shadeblasting projects, whether you are a pro or newbie. You can email me photos or upload them here and we will feature your projects on the blog. It is appreciated.
Share this on social media or email by clicking below!


Nice example. However, no discussion about the technique! How about talking about how you do it? Thanks
John, great point. I plan to have a detailed tutorial on it in the future. I didn’t have it listed here because the pro, Dave, provided us the process in a nutshell here: https://www.glassetchingsecrets.com/blog/shadeblasting-mirror-and-glass/
Another one of his projects is featured here: https://www.glassetchingsecrets.com/blog/tiger-mirror-shadeblasted/
I actually did this a while ago and only took one picture. Once I get back into it, I will create photos of each step of the way. But basically, it involved turning a color photo into a grayscale photo with photo editing software, then printing it out on adhesive backed paper. Apply it to the glass and cut out sections of the stencil requiring slightly different shades, starting with the heavier blasted areas first (those that should be whitest shades). Then just keep cutting sections that have a different grayscale shade one by one. Other more experienced folks may have a better technique and suggestion. Hopefully some of them will comment below. Thanks!
It is a very exciting new thing to try! I would love to see the sequence photos.
Thanks for the idea.
Hey Eric,
Good to see you have the blog still going. I just read this today. For beginners I would reiterate to start very simple. Cut out circles and squares or any other shapes and just practice shading the edges to get the feel of it. Watch some you tube videos on airbrush stencil painting also. The technique is very similar to airbrush painting. I use a lot of clear plastic cards I make from the clear thin packing material used these days on everything. Cut edges and hold it up to the glass and blast along the edge. Sometimes with the card touching the glass for a crisp edge and sometimes with the card an inch or two away for a more feathered edge. It just depends what look you need.
Eric and David:
Thanks for the info, I am new to sandblasting glass.
A family member ask me if I could do a picture and I said I would try knowing that my first few attempts are probably going to be a learning curve, a major one with lots of failed pieces, but they will teach me and I will have fun trying.
So the steps you both commented above of how to accomplish that are very helpful.