
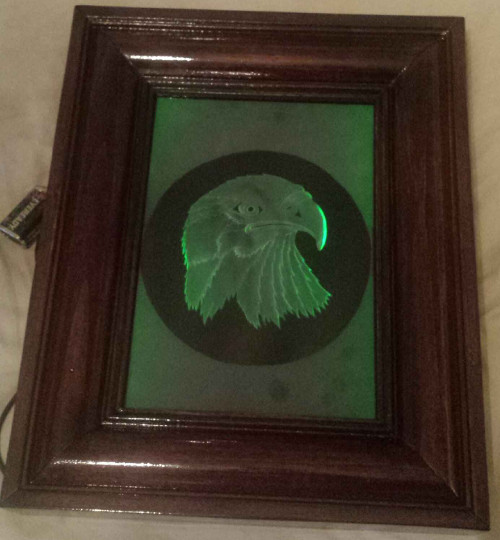
A tempered glass that was sandcarved in multiple stages while being framed with LEDs to light it up.
I discussed whether carving/etching tempered glass is possible in a past post. Since Omar sandblasted this lightly for a longer time than usual rather than using a higher pressure setting for a short period of time, it turned out a success! Also note, as I mentioned in my blog post tip that using a very small piece of tempered glass has less forces and was less likely to break.
He provided information on the glass type and thickness, how it was etched and how he installed the led light:
It was a piece of glass from Lowes Home Improvement — 1/4 thickness. I sand basted the piece with 150 grit aluminum oxide with a small sand blaster. The glass was tempered glass. I was very careful blasting at 25 psi for very long periods of time. This piece took 5 hours of work on a Saturday. I learned from this to not to use tempered glass ever!!!! It was a multi stage process. The lights was rgb leds with a remote-control. The frame was custom made from crown moldings and stain wood built in a shadow box frame to fit the rgb transformers and two 9 volt batteries
I want to thank Omar for sharing this and encourage other to leave him a comment below whether you what to thank him for testing multi-stage techniques on tempered glass or ask a question.
Share this on social media or email by clicking below!

I love this work and would like to begin to develop the skills.
Please help me.
Please send me a list of the kit I need to be able to work in this way.
I dont have a garage just a workshop in my house. I couldnt manage big pieces of kit.
The person who did this work said “I used a small sand blaster. What odes this mean? Have you got the names of such kit/
Again please help
John Covell
What a great piece. This is a wonderful piece for an office or library.You did a beautiful job, Omar.
You have created a beautiful piece of art and by highlighting the completed art piece with lighting just makes it softer looking and gives off a warmth. Where do you do your sandblasting? Do you use a booth and if so what kind. I purchased a small booth and I really can’t use it. Poor inside lighting and dust removal just doesn’t happen. I don’t have a large area to work in so I’m looking for something compact. Any suggestions you may have would be greatly appreciated.
Regards,
Rob
That’s a beautiful piece. My question is why do it in tempered glass when at that size and not in a door or some other area that required tempered glass annealed glass would have been easier. The only time I would attempt to etch tempered would be shower glass our some other glass where code required tempered and that would buyer beware because it may break if you look at it wrong. I have had tempered blow in my gloved hand when blasting with fine grit & low pressure. either way nice job! Take care Clyde
Welll thx well thanks everybody great Colin I appreciate all you guys ccomments to answer some of the questions I didn’t have the means to buy good class at the time so I went to Home Depot and I purchase a piece of glass which cost no more than $3 about the sandblaster in the same Kevin and I’m using pressure pot from Harbor Freight 40 pounds and I purchase a small 24 by 18 all in case fiber glass cabinet with a small white fluorescent light in a small port to put ad shop vac through it to get rid of the dust I will double check my records to see what was the internet store which I purchased the cabinett which came with 10 pounds of 150 grit a book of stencils in the cabin and for price of $500
Welll thx well thanks every body great comments I appreciate all you guys ccomments to answer some of the questions I didn’t have the means to buy good glass at the time so I went to Home Depot and I purchase a piece of glass which cost no more than $3 about the sandblaster I’m using pressure pot from Harbor Freight 40 pounds and I purchase a small 24 by 18 all in case fiber glass cabinet with a small white fluorescent light in a small port to put a shop vac through it to get rid of the dust I will double check my records to see what was the internet store which I purchased the cabinett which came with 10 pounds of 150 grit a book of stencils and for price of $500. The pice is done in a 12 by10 pice of glass from home depo 14 inch tick an yes is in my home redy to go to my office in the base ft drum ny.
Nice work. Tks for all the info, what type of compressor are you using? Horsepower? I have thought of using that pot that you use. Just didn’t think my compressor could handle it. I do all my blasting in a Harbor Freight cabinet. I do beer mugs, flasks and mirrors. Have to get around and submit some samples soon.
Beautiful job. I like the fact that you are not having to use expencise material and blaster! This article should encourage new novice artists to give this a try knowing that it is affordable.
Great Job!!! It looks wonderful. Can you send me a picture of the back with the LED connections?