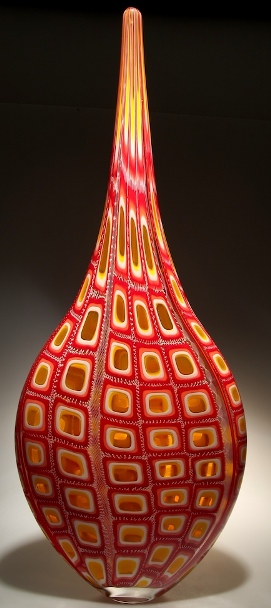
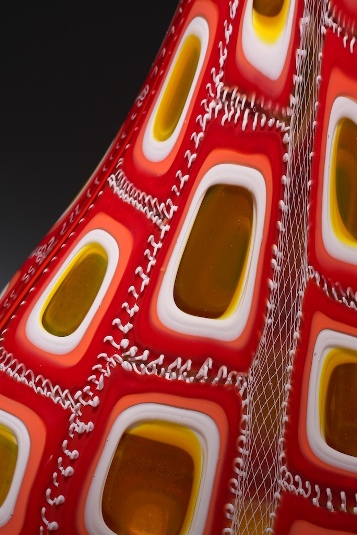
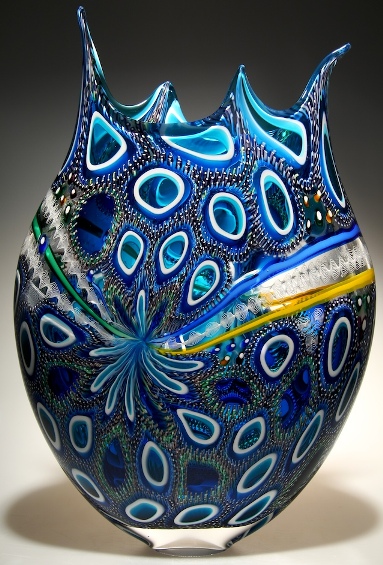
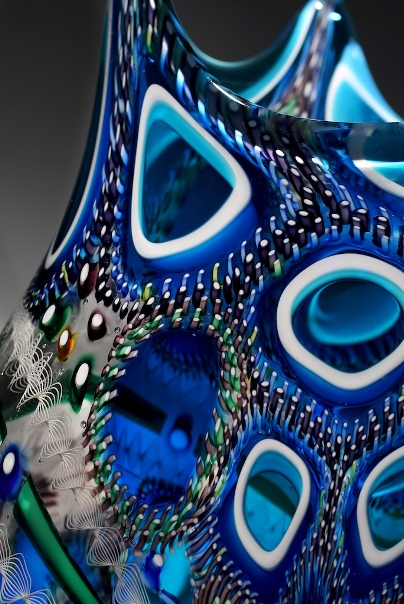
Hi everyone, I am glad to kick start the art glass spotlight which will be featuring a new glass artist each week. Our first spotlight post is from David Patchen. He provides two amazing examples of his blown glass art and the details he provided is below. Each example is followed by a close up showing the details and amount of skilled techniques he uses.
The photos show blown glass made using advanced Italian techniques of murrine (patterned tiles of glass) and cane (colored or patterned rods of glass). These techniques are very labor-intensive, but its the best way to create highly detailed patterns in blown glass.
A quick overview of the process: cane and murrine are made in the hot shop by layering colored glass and stretching it. Once cooled, cane and murrine are cut to size and arranged in the desired composition on a ceramic plate. This plate is then re-heated fusing the patterned glass together, which can then be rolled up onto the end of a blowpipe, encased in clear glass and blown to the desired shape. Some photos of this process are here: http://www.davidpatchen.com/content.php?sec=studio
The glass blown art work ranges in size depending on the series, but its often 18″ tall by 12″ wide and 4″ deep for the Foglio series, while the Resistenza series is 34″ tall by 12″ wide and 4″ deep.
Thank you so much David, not just for showing photos of your marvelous work, but also for details of what murrine and cane glass art is. Its always interesting to learn all the different glass arts out there.
Everyone, please help David get more exposure to his glass art by hitting the Like button below. I think he deserves it. Let’s try to give him at least 100 200 Likes!!!
Also, please leave comments below to show any compliments or ask him questions.
Share this on social media or email by clicking below!


it’s so, so wonderful!!!
congratulations!!!
beuatiful, beautiful!!
I think I’m drooling a bit.
Too cool! It actually looks like it’s been sewn.
Amazing!!! Your work is stunning!
WOW!stupendous!!!
Incredible! I really enjoyed the step by step photo log! Beautiful, amazing work!
Unbelievable work. Just wonderful! Thanks for sharing.
Outstanding. Your work reaffirms my love of glass.
Wow, that is just gorgeous! I tweeted this link on Twitter where I have 3500 followers! Hope it helps some. Your art rocks!
OMG stunning
Awesome! I can’t even fathom the amount of effort this must require! Well done!
Cool!!!!!
Wow!! Amazing!! I have great admiration for glass blowers. I have not seen this technique before. Where do you sell?
Very cool
Brilliant…..really lovely craftsmanship.
this is amazing really awsome
really nice work good luck
That is so amazing. I am awestruck!
I just love those. What a colours and details. Joy for my eyes!
just wonderful!
Very nicely executed!!! Beautiful blown glass. I know that blowing glass is a very difficult task, trying to keep the punti rod moving all the time, while the glass is being heated in the “glory hole”. I especially like the blue glass example, maybe because of the asymmetry, but also because of the flow lines of the glass itself.
Keep up the good work!!
Beautiful work. The blown glass work has the most brilliance of all the glass arts. The detail you’ve achieved is amazing. Each work stands on its own and is very watchable. Can imagine the variation as the light changes during the day. Of course a piece like this should be in its own niche, with special lighting, and on a slowly rotating base so every side can be seen
Thanks for sharing your process. Your pieces are lovely.
Amazing – the details, colors and overall affect truly give your Murrine and Cane Glass Blown Art spectacular presence.
Wow, thanks for all the nice comments! I love designing and making the work, and hearing when others appreciate them is excellent.
Lynette–there’s a list of galleries I show with on my site here:
http://davidpatchen.com
Absolutely stunning work thank you for sharing.
CA
Absolutely amazing.I am in awe of the detail in this work and the colors are BEAUTIFUL.David you have inspired me and I thank you for sharing your work with us.
You are my new glass hero!!!!
Excellent work David. The attention to detail is amazing. Well done!
David, thanks so much for sharing your beautiful work with us. You deserve more than a “like.” YOU deserve a “love.”
Dude, the latty stitch work, sssiiiccckkkk!!!!
Vicki, I like your comment. LOL. Where can I get a
“love button” instead. thats great and I agree.
Hey everyone, check out this video of him. The process itself is amazing.
Gorgeous glass with crazy little details….really beautiful!
this is awesome murrini and cane work! it makes me miss my time in the furnace shop. the color contrast and care taken in applying the canes is very apparent. this was made by experienced hands to say the least. if anyone has any questions about glass, how it is worked please write me on facebook.
Wow, this work is really something special.
Wow this is pretty amazing. I am very new to the glass world and am awed to see how fast you work! I also never knew you could made the murrines stick together, though now that I think it makes sense. Quite an inspiring piece! Thanks for sharing with everyone.
Wow!!!! Love it! Love it!
What a beautiful Piece! I went to a Chihuly exhibit in San Francisco and was wowed but I think you are right up there in comparison.
Cool
Fantastic Work!
I had the pleasure of visiting the Glass Museum of Washington and watching students of Chihuly’s practice their skills. Your work equals that, plus some!
fantastic
WOW absolutely beautiful
I love your work. Beautiful pieces and great choice of colour. You are obviously very talented! It is very inspiring to see. Keep up the good work!!
Beautiful!!!!! Would love to learn how to myself…
Stunning artwork – thank you for sharing !
Very beautiful work.
Dear Sir or Madam,
Thank you for the opportunity to present you our unique mixture for overlay colours!
On the following, I will thoroughly explain our particular and innovative product.
I would suggest you to watch our video, which shows the simple technique of use, identical with any other frits work.
There are two basic types of frits according to their destination or position on the finished product: inside and outside frits.
The inside frits are used for the interior of the open shapes as vases, plates etc.
The outside frits are used for the exterior of the object.
The exterior frits have an interesting property to change their colour by the glass temperature.
With the blob of molten glass on the tip of the rod, collect the frits from the marver by rolling it or simply by pressing it on the place you need, depending on shape, design etc. When the glass cools down, the colours start to emerge from a rather faint colour to a strong one. Furthermore, when the pre-shaped blob is reheated for blowing, the colours fade away, only to return when the glass cools down.
One type of frits (Silver Moon) has an even more specific property. When the shape is ready, by using a wet piece of paper, while rolling the blob on it , the rainbow of colours disappears, being replaced by a silver mirror aspect.
The frits are available in different grits according to purpose. There is also no limitation for the minimum and maximum quantity to be used. It only depends on your inspiration, intensity of colours, destination, shape, or client’s choice. That will only change the intensity of the chemical reactions, because, in comparison with regular frits which simply melts in the mass of the blob’s molten glass, our mixture produces a chemical reaction inside the glass.
The mixture is very stable, releases no toxic fumes, ashes or any other byproducts.
Please, feel free to ask any questions. I hope our product suits your interest, any inquiry is welcome. Even though there is no minimal purchase, we recommend a 500g order not only for the delivery price influence but for the opportunity to try different combination. We offer a range of mixtures, listed below:
1. Silver Moon
2. Inside Magic:
– Morning
– Evening
3. Interlacing Dreams
4. Elements’ Whisper
There will be an independent page available soon with different technologies like:
– luster
– iridescent glass
– scavo(but a real one not just a dust blown on glass)
– galvanic metal layer(copper, brass, silver, gold)
– a similar frits product but one which turns to gold instead of silver aspect under some conditions.
We are looking forward for your reaction.
Best regards,
Sorin Dobrescu
Contact:
Mail: sorin.dobrescu.euro@gmail.com
Mobile: 0040 748112553
Facebook: https://www.facebook.com/GlassTechnology?ref=tn_tnmn
Address: Grigore Moisil Street, No4, Block 6, Apt 23, Sector 2, Bucharest, Romania