

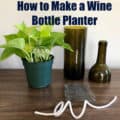
Personalizing a glass wine bottle can be a great gift for a wedding, anniversary, birthday, or special holiday. And one way to personalize the wine bottle is to etch it and below I show you a the steps it tales to create one with photos to follow along. If you already know the basics of etching glass, then its really the idea that counts so give it a try.
First, pick up a good bottle of wine and remove the front label. The labels are usually hard to remove so you can try to soak it in water for a while. I then use a razor blade to scrap the paper label off quickly, and then rub off the glue residue with lacquer thinner and a rag.

For the second step, I place the vinyl sheet or contact paper around the front of the bottle.

Third, draw or trace a white and black stencil design onto the vinyl sheet. Try to make it level as much as possible. There are some ways to do this by measuring. After the pattern is traced, cut out the areas that you want etched. This is usually best done with an exacto knife.

Fourth, mask off the outer areas of the stencil. This will prevent any areas that you don’t want etched to be exposed to the etching cream or sandblast.

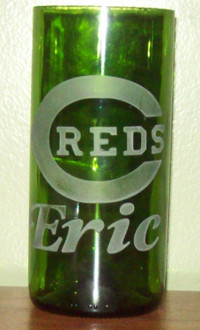
Fifth, once ready, etch with either the sandblaster, cream, or engraving method. For this example, I used the sandblasting method which will lightly chip the surface of the glass. All you do is blast over the exposed areas of the stencil evenly.

Sixth, wipe off and wash any reside. Then peel the vinyl resist off by using an exacto knife to assist.

That’s all there is too it. Then just give away the etched glass gift for your occasion. Please leave me any comments or questions below. If you liked this free tutorial, I think you will like my etching manual: www.glassetchingsecrets.com/info.html. Check it out or please leave me a comment!
Share this on social media or email by clicking below!

Good tutorial. I am vlessed with a small vinyl cutter.
Rockie
I like this idea and have done a few myself, it does take a little patience but well worth the personal touch trying to achieve..
Hi Eric
Thanks so much for this tutorial, I have had glass etching cream in my drawer for probably 15 years. I did one project and that was it, so now you have sparked my interest again. I am a stained glassoholic for about 25 years.I sell my projects at a hospital once a month , and love every minute of it.
Thanks again
Em
Hi Eric. The bottle looks fantastic, thanks for showing us, i did my first etching of two teddies, my etching cream is blue and doesnt seem as bright as yours any tips
keep up with the etching
diane
Hi Eric, Fantastic bottle, my first etching was a teddy on a photo frame, but my etching cream is blue, mine not showing up as good as yours any tips
thanks diane
This is a great idea. I have alot of empty wine bottles setting around and have thought I would make some tiki torch’s with them the engraving will make them more attractive.
Diane, my etching is more noticeable because I used the sandblasting method. Sandblasting the glass gives a better looking etch than the cream. Also, what kind of etching cream do you have? I’ve never seen a blue kind. Anyone know what this brand is? Thanks
Good tutorial. I leave the front label on and take the back one off. Then I use rub and buff to set off the etching. I also have a sandblaster. To me it looks more professional.
here you showed different steps . but one thing how can apply etching cream on the glass with brush? or sprayer pl show that.
Another one thing etching cream brought from market?.or making own .i mean mixing any chemicals.
how can use blasterpot.that is not showed here.
Just started doing wine bottles just for fun. But have learned a few things. To remove the label fill your sink with the hottest tap water you have and the bottle to, leave it in the bath for about 15 min the label will come off pretty easy. I did get a little fancier with the stencils by using a Cricut stencil cutter and the program “Make the Cut” the cricut was $99.00 and the Program was $58.00. I picked the cricut up from Michaels and the program is readily available on line. So far have done Alladin and Jasmine, Rajah, and the Genie. Also numerous Christmas stencils. If you use a product called rub and buff bought at the local craft store your designs really stick out.
Hey, Gman- awhile back I did a lot research on the different stencil cutters. The cricut was one of them and the bad thing I remember about them is that they didn’t cut very thick vinyl for sandcarving and you had to buy these chessy patterns in cartridge packages. But from what I recall, someone developed a software for it that can cut any graphic. Is this Make the Cut software what I am talking about?
Eric,
Make the Cut was the program a young lady at the local box craft store recommended and she seemed quite knowledgable about the program and the cricut. Make the Cut allows me to download a picture and do a pixel trace to reproduce it. Right now I’m cutting 3mm vinyl but feel very confident that I could cut thicker vinyl without a problem. Im waiting now for a shipment of the oramask vinyl which I found the address in your book (Thank-you very much) Buying the cricut vinyl costs #10.00 for two 12″ x 24″ sheets. The real drawback with the cricut is the stencil size. The largest I can produce is 51/2″ X 11 1/2″ but for my early begininigs it suffices. Going to try a craftshow with my wife in November to test that wine bottle market. I use the cricut personal but you can upgrade to cut larger stencils. My problem beng artisicly challenged is trying to figure out what part of the stencil to eliminate after it is cut. I usually guess wrong and end up sandblasting a negative image. Oh yeah by the way I use a small cabinet gravity flow sand blaster and get some real good results. I have varied the pressure from 30lbs to 100lbs I’m just limited to object size.
Very nice presentation. Good to see you get back to people and share your experience. So nice to have a real person that takes the time to explain things.
My biggest question is pricing. How do you know how much to charge?
Dave, that is a good question. Maybe I will email everyone and create a discussion on this topic.
Could you sandblast this? Woudl you? or could it turn into a MESS?
Sorry, the post is somewhat confusing. I did sandblast it, but for the picture showed the supplies needed for the cream process if you wanted to take that route.
Thats cool. I think that would be a neat farewell gift idea! Is it a full bottle of wine? or an empty?
You can sandblast on full bottles of wine. I have done it many times. This specific tutorial, was just an example because there was no occasion at the time so I used an empty one.
Is it safe to use etching cream on full bottles of wine
Cindy
Yes, you can definitely use etching cream on them. Thanks!
I have been sandblasting wine bottles for about a year now. When completed I add Christmas light of different colors and get a very pleasing effect. My question is how and what type of paint could I use to give it a bolder look? I want to be able to use different colors.
Thank you very much for the info, to sand carving on wood is the same procedure thant glass?
I just received some Rub N Buff. Boy what a difference that has made to my etching bottles! Thank you for mentioning that in your tutorial.
Your demonstration was interesting because I’ve been sandblasting on wine bottles on and off for the last 20 years! I’ve 2 comments that may be of interest to other bottle blasters: I use, what in this country, is called application tape. One applies it to the vinyl after the pattern has been cut. This keeps everything in place before applying it to the bottle. The next step is to remove the backing paper and place it on the well cleaned bottle. After rubbing the whole pattern – the back of a spoon works well – to be sure it is thoroughly stuck, one then removes the application tape. After masking the bottle and sandblasting, my 2nd comment kicks in: Before removing the vinyl I spray the sandblasted area with paint (Gold in a can is stunning!). Then I remove the vinyl. Unfortunately the paint often leaves a residue from the vinyl which I remove – with difficulty – using saliva and a scalpel! Hope this explanation isn’t too garbled.
It is great to see that I am not alone with the wine bottles. I have a set up for cutting them. Some bottles got a drnt in the bottom and I cut ofrf 3 inches and turn it upside down and it holds an egg. Now on this egg cup I will sandblast whatever or sometimes I will engrave on it.I have the ultra violet light stencil set up which is good except it takes a lot of time to make the line drawings.Great site keep it going.
I am into stained glass and sandblasting as well as engraving.I am set up to cut wine bottles and sandblast on them. I make egg cups from the bottob of the bottles that have a dent in them. I will then sandblast a chicken or whatever the buyer would like on the egg cup also their name.Great site keep it going.
This has been extremely beneficial and helpful to me as a novice in the etching/engraving arena.
I am blown away by your tremendous generosity. Thank you very much.
It’s an excellent job well done.only that here in Kenya, Africa, idont know where to get it, how much and how can iget it, thanks you.
I use “goo be gone” to help remove labels. Another idea is using “shout” from the laundry room.
For sandblasting i use rapidmask 2mil on wine bottles ..
I develop it with a uv litralight photoexposure unit. Works great… we are currently working on 23 cider bottles …. we use the metallic alcohol paints from Michael’s to paint any glass we engrave… the non metallic dont look good…. now if you really want to use non metallic paint by oneshot paint for cars… we use a airbrush for that paint and looks great
I used Armour white etching cream on my blue wine bottle. Left cream on for 5 minutes brushing it constantly. Washed it off and it didn’t etch at all. What did I do wrong?
I used this method for many years and it works great but I wanted more detail so started to use apm film to make stencils.
This is definitely the way to go.
Very good tutorial. Thank you!