Member's Login
Glass Etching Secrets: Learn to Create Etched Art Glass with Stencils & Unique Techniques
  • Home
  • About
  • Etching Processes
    • Sandblasting
      • Sandcarving
    • Cream
      • Free etching cream!
      • Armour Etch Glass Etching Cream
    • Hydrofluoric Acid
    • Engraving
    • Basic Supplies
  • Blog
  • Shop
    • Armour Etch Glass Etching Cream
    • Pressure Pot Sandblaster Plans
    • Make a Mini Sandblaster Plans
    • Vari-Blast Sandblaster Footswitch Plans
    • How to Make an On-Site Sandblaster Plans
    • Sandblaster Tee for Pressure Pot with Conversion Kit
    • On Site Glass Sandblasting Kit- “Vacu Blast”
    • Stencils Shop
    • Glass Paint
    • Sandblasting Rock eBook & Guide
    • Sandblaster Nozzles & Hoses
    • Bottle Cutter
    • Glass Candle Making Supplies
    • Glass Etching Kits
  • Glass Etching Secrets eBook
  • Contact

Simple Surface Etching Tutorial Sample

Posted on December 13, 2009 by Eric Robert Posted in Blog Content

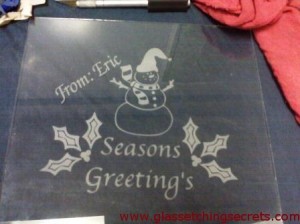
Since we’re in the Christmas month, I figured I would show you a sample of etching a Christmas based theme.  I showed this example on another craft site a few weeks ago, and figured I would share it here as well.  This is very simple and I will show you some more advanced examples soon.

Below is a picture by picture example tutorial with the very basics.  If you have an intricate design that you have to cut for a stencil, you can have me do it for you by writing a interesting project idea on your blog and link to my site.  I will ship it to you free of charge.  Just see my requirements to get a free stencil: https://www.glassetchingsecrets.com/freestencils.html.

Step one is to cut out a stencil, place it on the glass, and mask the edges:

Stencil placement picture

Step two is to etch the glass evenly:

I etched it with sandblasting methods.

Pick a etching method


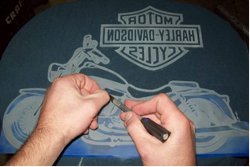
Step three, observe the glass, making sure it is etched at all areas, and then remove the stencil:

Shows me peeling off the stencil.

Remove stencil from glass with exacto knife.


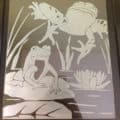
Step four, clean up any left over adhesive from glass, wipe clean, and flip the glass over to observe the etched areas.  Also, you can etch the glass from the front side, but I chose to etch it from the back.  Remember, if you etch it from the back, make sure you flip the stencil design.  This can easily be done with computer software.

Completed etched glass after its clean.

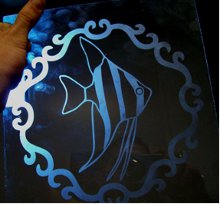
End product of a simple etched piece of flat glass.


If you have any question, please feel free to leave a comment and I will answer you as soon as possible.  Seasons Greetings everyone!  I will be posting another example with sandcarving basics.


Share this on social media or email by clicking below!
Facebooktwitterredditpinterestmail

Related posts:

Simple Steps to Cream Etching Simple Steps for Sandblast Etching Default ThumbnailHow to Tutorial Guide Frog designs etched on glass surface.Frog on Lillypad Basic Surface Etching Design
« Beginning of the Glass Etching Ebook
Steps for Sandcarving Glass »

Leave a comment

Your email address will not be published. Required fields are marked *

Sign up

Categories

  • Blog Content
  • Glass Art Spotlight
  • Glass Etching Stencils Shop
  • Other Glass Supplies
  • Other Pages
  • Questions About Products, Etching, & Sandcarving
  • Sandcarving Examples
  • Tutorials

Access Training Material

Order the training materials here.

Search

Copy Code & Add to Your Website
Contact Us | Privacy Policy and Terms of Service | Informational News Blog | Members Login Secure payment by paypal and these credit cards.
Grab a Button
I'm a fan
© Glass Etching Secrets