Member's Login
Glass Etching Secrets: Learn to Create Etched Art Glass with Stencils & Unique Techniques
  • Home
  • About
  • Etching Processes
    • Sandblasting
      • Sandcarving
    • Cream
      • Free etching cream!
      • Armour Etch Glass Etching Cream
    • Hydrofluoric Acid
    • Engraving
    • Basic Supplies
  • Blog
  • Shop
    • Armour Etch Glass Etching Cream
    • Pressure Pot Sandblaster Plans
    • Make a Mini Sandblaster Plans
    • Vari-Blast Sandblaster Footswitch Plans
    • How to Make an On-Site Sandblaster Plans
    • Sandblaster Tee for Pressure Pot with Conversion Kit
    • On Site Glass Sandblasting Kit- “Vacu Blast”
    • Stencils Shop
    • Glass Paint
    • Sandblasting Rock eBook & Guide
    • Sandblaster Nozzles & Hoses
    • Bottle Cutter
    • Glass Candle Making Supplies
    • Glass Etching Kits
  • Glass Etching Secrets eBook
  • Contact

How to Tutorial Guide

Posted on May 15, 2012 by Eric Robert Posted in Other Pages

This is a very basic tutorial on how to etch glass used primarily for simple craft projects. I go more in detail about advanced stuff you can do with cream etching and discuss my favorite sandblasting or sandcarving process in the information manual.

how to etch ebook.I am now providing a free ebook on how to do this.

I hope it is helpful, and please let others know about it. To download, click here and save to your computer.


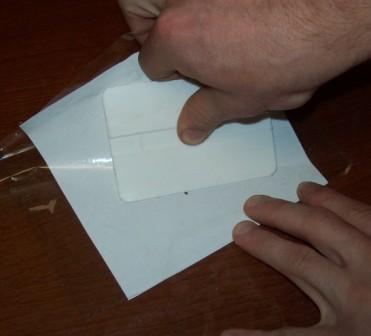
  1. Place your vinyl resist material on your glass by either applying an adhesive or by using vinyl with its own adhesive backing. Use a squeegee to ensure the vinyl is fully intact to the glass without any bubbles. First step of applying stencil resist to glass.
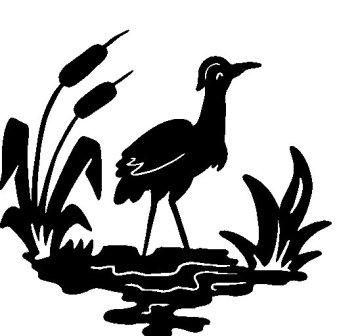
  2. Transfer your design or pattern onto a vinyl resist material. The basic ways to do this is to either hand sketch a drawing or trace a design by using transfer paper. The graphic will have to be black and white with no gray scale image. Second step of finding a suitable design.
  3. To produce your stencil, cut around your graphic and remove the parts you want to etch. To do this just cut along your drawn lines with a sharp knife or Exacto knife. Once all the lines are precisely cut, peel or weed the areas away to exposed them. Cutting out your stencil.
  4. Etch your glass with any process you desire:
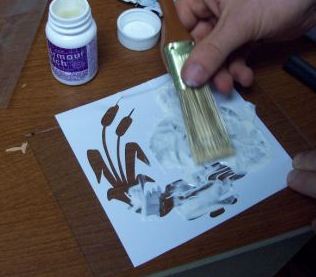
  • Cream Process: Spread your cream thick over the stencil and wait a few minutes as instructed. Applying the cream over stencil to etch.
  • Sandblasting Process: Blast abrasive with your sandblaster over the stencil and peel the stencil off. With this, you can have more advanced processes and create artistic art by staging the sandcarving steps and using shading techniques.
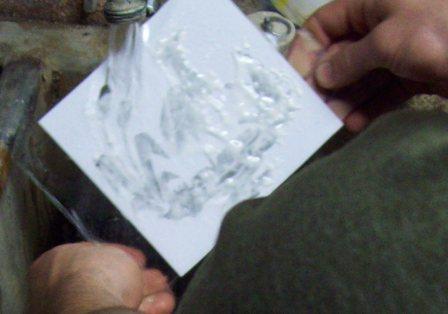
  1. Clean up by washing off your cream or abrasive and peel off your stencil. Step 5 showing the cream being cleaned up.
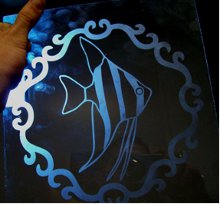
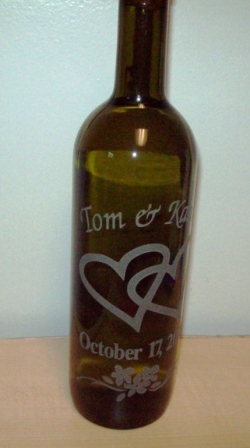
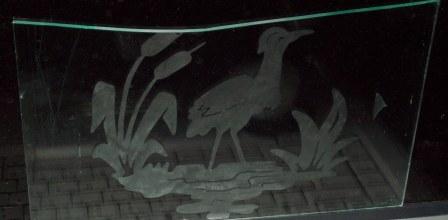
  2. See the finished etched glass and enjoy- (Example shows characteristics of the glass being cream etched.) A picture of an acid cream etched finish.

Share this on social media or email by clicking below!
Facebooktwitterredditpinterestmail

Related posts:

Default ThumbnailEtching Supplies Simple Steps to Cream Etching Personalizing a Wine Bottle Tutorial Default ThumbnailHow to Sandblast Glass Tutorial
« Wood Base LED Example
Glass Etching Equipment »

Sign up

Categories

  • Blog Content
  • Glass Art Spotlight
  • Glass Etching Stencils Shop
  • Other Glass Supplies
  • Other Pages
  • Questions About Products, Etching, & Sandcarving
  • Sandcarving Examples
  • Tutorials

Access Training Material

Order the training materials here.

Search

Copy Code & Add to Your Website
Contact Us | Privacy Policy and Terms of Service | Informational News Blog | Members Login Secure payment by paypal and these credit cards.
Grab a Button
I'm a fan
© Glass Etching Secrets