
Tips on How to Score Your Bottle Perfectly
- Remove label and clean adhesive as best as you can
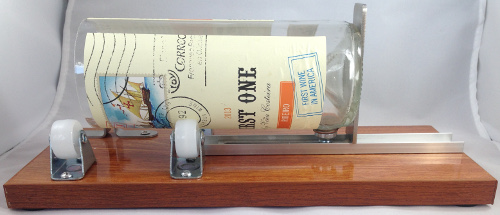
- Remember to hold the bottle against the back brace while turning
- Turn the bottle only once around, but you may go over areas that weren’t scored as well a second time.
- Apply pressure in between the wheels but closer toward the cutter and it works even better by applying pressure to the bottle neck at the same time while turning.
- Apply enough down pressure and evenly while turning the bottle.
- This is the most important!
- Most of the time, we find that folks don’t have enough pressure applied while scoring the bottle.
- Lately, I have been recommending folks place the cutter on a lower area such as the seat of a chair or coffee table height while scoring it.
- This allows you to have better leverage forcing the bottle down more + better consistency. It is super easy this way!
- I guarantee this will solve most people’s problems cutting bottles and it will produce perfectly cut bottles almost 100% of the time.
How to Successfully Separate the Bottle
The bottle separates along the perfect score line that our bottle cutter creates by adding heat and then cold water. Follow these tips for success:
- You can use boiling water to heat up the score line or a heat gun. I find that a heat gun works better because the heat doesn’t flow down the bottle like water does which provides worse results. A heat gun is also less wasteful, more convenient, quicker, and less of a hassle!
- Low cost heat gun with a smaller attachment can be found here: https://www.amazon.com/s?k=mini+heat+gun&asin=B06XDCSCMH&tag=glasetchsecr-20
- Direct the same amount of heat all around the score line. Do this by holding the heat gun steady at the score line and turning the bottle at a consistent speed.
- There is a sweet spot in amount of heat to apply to the score line! Too much heat will make the bottle crack in undesirable places. Too little heat and it may not separate along the score line.
- I will be testing this in the future and recording the temperature to heat the score line with an infrared thermometer for the best separation.
- The amount of heat needed may differ for bottles with thicker glass walls (such as wine bottles) in comparison to thinner glass walls (such as beer bottles).
How to Smooth Out the Cut Bottle
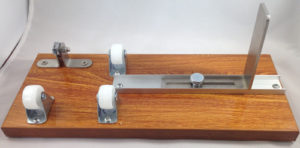
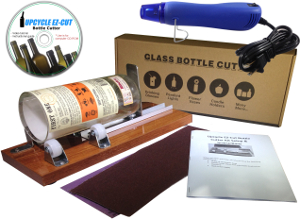
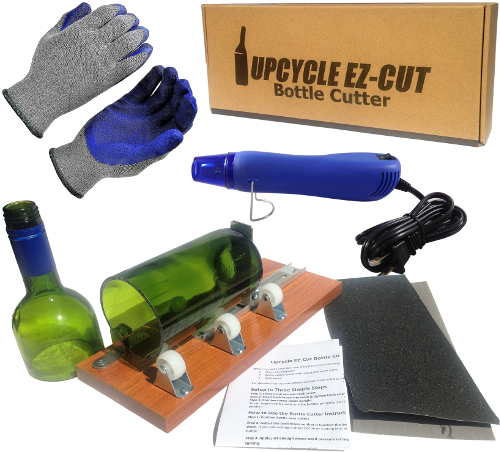
Upcycle EZ-Cut bottle cutter 
You will need to smooth the cut line– it is sharp so be careful! Our kit provides sandpaper to manually sand the edges but for an less labor intensive solution I have been recommending this idea described here.
Where to Get the Upcycle EZ-Cut Bottle Cutter
If you haven’t ordered our cutter, and we think it is one of the better ones, you can do so on Amazon by clicking the orange button.
Or view all our models on Amazon here!
Share this on social media or email by clicking below!
Hi, love your tool but have u developed a way to cut off the bottle bottoms with this set up? My projects requires me to cut off both wine and beer bottles near the bottom and I require both parts. Is your blade eventually replaceable? Also what temp are u using the dual temperature heat gun? That is an idea I would love to try.
Felicia, thank you for your order and great question. If you insert the back brace into the track so that it extend it’s longest position and flip a regular wine bottle around so the neck touches it, you can cut about 2 inches from the bottom.
If you need to cut it lower than that, you cut cut the bottleneck off first, then flip it around so it reaches the bottom. I hope that helps. Thanks!
I don’t have a blow torch or a heat gun, so I want to use the boiling water method. Should I submerge the bottle in boiling water or pour the water over the cut line. How much water and how long should the water be poured over the cut line?
@Julie, great questions.
It’s best to pour the water over the cut line and try to limit the hot water from getting everywhere as that is the cause of the bottle cracking where you don’t want it to. This is the reason the heat gun or blow torch is best because it can be directed only at the cut line.
The amount of water might depend on the bottle and thickness so some tests should be done. I found about a small stream poured over the cut line while turning the bottle once or twice to be more effective. So maybe a couple cups of hot water.
Please provide details of the heat gun & availability.
@Patt, you can see more details about this heat gun here: https://www.amazon.com/s?k=mini+heat+gun&asin=B06XDCSCMH&tag=glasetchsecr-20
How long does the blade last and will it need to be replace and if you where can I get a new blade, thanks
Hi Doug, we haven’t tested how many bottles one blade can cut but we believe many people won’t ever really have to replace it. Our cutters come with some of the highest quality and hardest blades made of carbide materials. Depending on how well folks take care of the blade (such as scoring the glass only once around), it may last up to 100-200+ bottles. If we ever do a test, we will let everyone know.
Our replacement blades are listed on Amazon here: http://amzn.to/2ACBIY1 but unfortunately there is only one left in stock at the moment. Thank you
Hi Eric, do you have a tutorial of how to use a blow torch (propane heat gun) rather than an electric heat gun? Are there any additional safety issues that we need to be aware of? I haven’t used the bottle cutter yet, but am looking at your tutorials in order to get started this weekend. I have a blow torch but not a heat gun.
I’m just trying this for the first time and overall love it. My first cuts I have some chips/rough edges. I think I twisted and didn’t just pull straight. Any tips on what to do with chips on the edges? Sandpaper isn’t enough. If I just cut lower how do I safely separate the pieces?
Is it possible that the cutter is not sharp enough? Supply heavy pressure and rotating the bottle there are parts that do not score at all. I have the cut angled at 10:00 o’clock and it’s making contact just not scratching the glass. When I run my finger over the cutter it’s super dull. Is that how it’s suppose to be?
I just got the upcycle ez-cut bottle cutter. How do I set it up to cutthe bottle necks off?
Bruce , if you are trying to cut the skinny part only, unfortunately the blade can’t be adjusted closer. However, if you are open to modifying the unit, you can move the front wheel and the blade holder closer in by undoing the screws and screwing it in closer to the middle of the board. If those are measured and moved closer, it will work.
Otherwise, you can only cut the wider part just before the bottleneck. Sorry about that.
@ Colleen Jimenez, it is possible that the blade is dull. However, it feels dull like that to touch. If there is a slight point to the cutter, it is still good and is only visible when looking up close.
The blade can last a very long time if it is turned around the bottle once. Double scoring it can wear it out quicker.
It is possible that the blade needs to be angled differently. The disc on the blade should be about perpendicular to the bottle surface and can vary by bottle size. If it is worn out, we can supply a new blade. Thank you!
@Michelle McCune, the chips usually happen if the downward force while turning wasn’t consistent. This causes score lines to be lighter than other areas which is the main culprit. To fix this, view the score line and go over any parts that are light a second time before attempting the hot/cool cycles to separate it.
For sanding, the diamond sanding pads work a lot better which are shown here https://www.amazon.com/Bottle-Cutter-Diamond-Flexible-Version/dp/B07JHXF46Q/ref=sr_1_5?m=A9PJY69F3961Y&s=merchant-items&ie=UTF8&qid=1547149737&sr=1-5&keywords=bottle+cutter&refinements=p_4%3AUpcycle+EZ-Cut+Bottle+Cutter
Thank you!
Do you have tips about removing the labels? Some of theme are very labor intensive.