
I decided to create this quick instructional guide to help assist those that got a free etching stencil (glassetchingsecrets.com/freestencil.html) from me. It’s fairly simple but it should help. When you receive them in the mail, they should look like this below. They have three layers of sheets. The top layer is a clear sheet which transfers the stencil. The middle layer is the actual stencil itself which is blue. The bottom layer is white and is just the backing paper which will get removed. Remember to clean the glass thoroughly even if it looks clean. Glass usually has oils from your hands on it so use something like rubbing alcohol to clean it.

Follow the steps below:
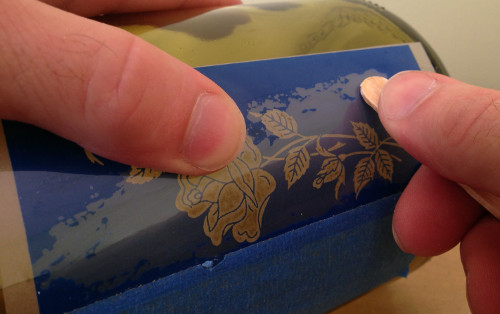
- Remove the white backing paper from the other two layers. You do this by pulling the clear transfer sheet off, and the blue stencil should be stuck to it. Make sure you pull it off slowly so that every stencil detail is sticking with the clear sheet. You need to pull it off 180 degrees as seen below.

- Place one edge of the stencil onto the glass or what ever object your using. You’ll have to line it up correctly by measuring it, or you can eye ball it which I didn’t really do since this was just a sample.

- Now smoothly squeegee the stencil onto the glass making sure there are no air bubbles. If you don’t have a plastic squeegee, you can use a lot of different things such as cardboard. If its a small stencil like this one, you can also use your finger if you want. Make sure it is firmly placed onto the glass, especially paying attention to the edges so that your etching cream or sandblasting media doesn’t get under the stencil.

- Remove the transfer sheet by pulling it off 180 degrees and make sure that none of the stencil comes up with it. If the stencil starts to come off, place the transfer back the other way and try again at 180 degrees.

- Then all you do is mask off the outside areas of the stencil and etch the exposed areas. I made a tutorial that shows you how to etch glass (link) if you need further guidance.


My last suggestion was to run hot water over the stencil after you have etched the glass. This will make the stencil come off very easy.
Share this on social media or email by clicking below!
As an example of your charges for stencil production, how much would you have charged me for the stencil you used in your tutorial. This was a very simple design, and I am pretty sure your price goes up proportionate to the complexity of the design. What type of files can you use for the clipart I choose to use in the stencil. Any info about your services and charges would be appreciated.
Hi Stan, good to here from you. I haven’t been providing the service lately but I was offering the service free for other bloggers that shared the finished product but that hasn’t been very effective. So maybe Ill think about doing it in the future.