
These are the simple steps it takes to etch a glass in a list form. I also provide another picture tutorial on how to etch glass here. Well anyway, here are the steps with a different project on how to do a very simple cream etching.
 First, you will need to find a design or pattern to mimic. You can design one in a graphics program which will allow you to include text, multiple different patterns, and other various editing tools. (See the Bonus section for free ones) With that created, you need to need to transfer the design onto the stencil. You can do this by drawing, tracing, or printing out the design onto a resist material such as vinyl or rubber. You can use contact paper for cream etching which is low cost and sold at nearby hobby stores. I have found a roll of contact paper for less than $3.
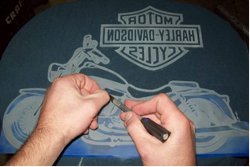
 Third, you will need to cut out the pattern by using a sharp knife such as a hobby knife. You just basically follow your traced lines. For this example, I used cutter equipment to manually cut out the design to size before I used a squeegee to apply the stencil to the glass. Depending on the stencil process, you can cut out the design before or after placing the stencil on the glass. After the design is cut, just pull out any of the cut pieces for areas that you want to expose for etching. Then, place the newly cut stencil resist onto the glass by smoothly smearing it onto the glass with its adhesive backing. If it doesn’t have an adhesive backing, then you will need to apply glue to the stencil resist.
 Once in place, you’re ready for etching. Take the etching cream (www.glassetchingsecrets.com/cream.html) and evenly spread over the stencil. For this example, I used the Armour Etch, but I have tried all different types of brands. I personally don’t think one brand etches better than the other, but some work quicker. There are ways to improve how it looks which I will be showing in my module 1 of the members area. It also shows some interesting advanced techniques of using it.
 Wait a few minutes to allow it to etch. It can take anywhere from 5 – 15 minutes. Please look at the recommended time that the manufacturer states on the bottle, because it can vary for different brands. Then wash off and wipe down any residue before taking the stencil off.
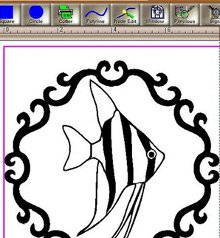
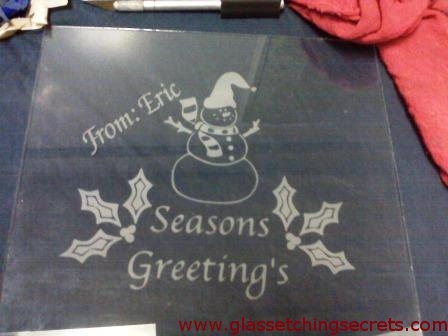
You don’t want the cream to etch in others areas of the glass which will mess up the design. After that is all washed off, peel the resist stencil off, and clean up. Then you have your finished glass. You can see my example on the left. It depicts a fish with a circular design around it.
 First, you will need to find a design or pattern to mimic. You can design one in a graphics program which will allow you to include text, multiple different patterns, and other various editing tools. (See the Bonus section for free ones) With that created, you need to need to transfer the design onto the stencil. You can do this by drawing, tracing, or printing out the design onto a resist material such as vinyl or rubber. You can use contact paper for cream etching which is low cost and sold at nearby hobby stores. I have found a roll of contact paper for less than $3.
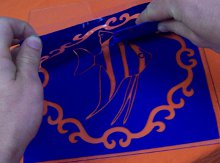 Third, you will need to cut out the pattern by using a sharp knife such as a hobby knife. You just basically follow your traced lines. For this example, I used cutter equipment to manually cut out the design to size before I used a squeegee to apply the stencil to the glass. Depending on the
 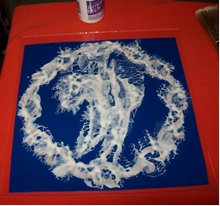 Once in place, you’re ready for etching. Take the etching cream (
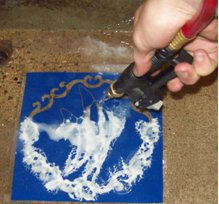 Wait a few minutes to allow it to etch. It can take anywhere from 5 – 15 minutes. Please look at the recommended time that the manufacturer states on the bottle, because it can vary for different brands. Then wash off and wipe down any residue before taking the stencil off.
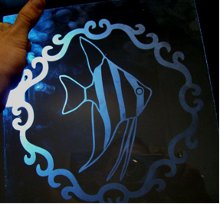 Then you have your finished glass. You can see my example on the left. It depicts a fish with a circular design around it.
If you have any questions regarding this process, please leave a comment below.
Also, share this with others by clicking the Like button.
Thank you.
Share this on social media or email by clicking below!

What type of glue did you use for the stencil? I have some Over N Over stencils should I use glue on them? I am obviously new to this so any and all information is greatly appreciated.
@Tom, in this example, no glue was used since the stencil was cut from an adhesive backed vinyl sheet. The Over N Over stencils don’t need adhesive applied either if the glass is clean. However, the adhesive is on the lighter side and can wear out if used several times. There is a reusable stencil adhesive that I wrote about here https://www.glassetchingsecrets.com/reusable-stencil-adhesive that allows the stencil to be reapplied.
I am etching on the back of glass interior windows to cover the wooden cross pieces on the other side.
I plan on using vinyl contact paper for economy reasons. And etching cream.
Are there any etching creams that would be best to get?
Thank you.